Wednesday 28 October 2015

Just Playing.....


Firstly, I am an avid craft magazine purchaser - consequently, I have a lot of freebies from them and the embossing folder used in this card came from this, as did the stamps used.


I have seen some beautiful cards with scenes on them and coloured northern lights background effects, and after looking at a couple of videos on this technique, I decided to do that. I also wanted to combine wet embossing with the dry embossing.......so I had a go at both on the same card. I must admit my wet embossing skills are not that good and my slapstick approach does show through,but again I like the light on the snow effect it has created - also like the depth in the windows I managed....the sentiment is white embossing on black embossing.....


Forgot how the snow would turn out
 but then, at night, snow would be black against the sky wouldn't it?


I think it looks OK but I should have embossed the sleigh I think too......

Then I had some other freebies - colouring page from a magazine - so in a quiet moment I used my Prisma and similar pencils to colour up this by basically following the suggestion in the magazine - too lazy to do anything else......


It's not exact but I like the colour/no colour look this created. 


So, then I did another but this time I used the Zest or blending solution as well to hide the pencil marks - I thought the other one was too small to bother


Hand-drawn edge


Tried to get shadowing going but the Zest was a bit too good at melting the pencil in plaes and it moved around a bit more tan I really wanted but I came back into it later and it worked. 


It's a groovy card!


Monday 26 October 2015

The Art of Possibility

The Art of Possibility.....

What can I possibly make for the current challenge at Unstampabelles?


Well, this is a sunset I photographed with my phone late last year - so pretty


You could use a photograph of a sunset or sunrise as the focal point of your entry
for the challenge over at UNSTAMPABELLES #51 as the theme is


The Sun! 
It can be rising or setting!! 

The twist is Gold! Gold! Gold!

You can win this prize!


I thought about using that photo to make a project but then I thought nah..........I want to play with my paints!

So, I am sharing today a project I made using my new Dylusional Paints - and yes, I worked in red, yellow, orange and black.  In fact this was the reason I ended up with pieces of card covered with these colours and from which I made several other cards and a tag - I have already posted these.......


I started by just smooching around some yellow on the edge of a sheet of white card. Then I added some orange to the middle bit. I found a stencil of flames and added this over the top using the red paint, to create the illusion of fire or heat. I really liked the outcome. 

I got another stencil - sun rays - and created the rays using Viva Inka-Gold, a fast drying metal paint. Still have not got the knack of making a clean stencil image, but it was a bit better. Obviously I dried of each layer - heat gun, yes couldn't wait. It was starting to look really good.


The next was to add the words to the whole, using black ink - TH Sooty Black
Now, can you spot the error I made while I was turning the sheet around and around 
to position the phrase properly?


Then I looked at it and didn't really know where to go next until I remembered I had several dies for hot air balloons..........so die cut them in black card


Added my balloons and then smooched some black paint this time around the edge of the image and layered it to a white card

I actually love it - error and all

So, a mixed media production
Loved getting my hands all painty and inky........

I will enter this in the following challenge(s):

Saturday 24 October 2015

Pinktober - offering support to those with Breast Cancer


 is offering support this month to the ideals behind the label of PINKTOBER - to raise awareness of the need for breast examinations and tests, and to raise some funds for continuing scientific research into treatments and cures.


A stamp by My Favourite Things


Die cut a circle and put image behind after I used TH Distress markers to colour it up


Hard to see but there are pink ribbon symbols clear embossed on the pink card as well as small pink ones on the pink card!


Inside I used the die cut to stamp a sentiment


You can see the symbols a bit more on this one. 

I sincerely hope that none of you, dear peeps, need a card like this to be sent to you.

I needed this card to send to a friend.
Bugger!

Over at Crafting with Dragonflies are some more examples of cards to make for Pinktober!

Monday 19 October 2015

Kookaburra's and Unstampabelles Challenge#51


I love Kookaburra's - and their call. I have grown up with them around me in the bush, and had several up-close and personal encounters. They are quite an intelligent bird and always seem to call at the most (in)appropriate moment: aka - when you have just done something stupid!

Dacelo novaeguineae waterworks.jpg

They are kingfisher's of course

I love that poem by James Lister Cuthbertson - I learnt it by heart as a 11 yo
He emigrated to Australia from  Scotland in 1874 and wrote this poem in 1880


      The Australian Sunrise
The Morning Star paled slowly, the Cross hung low to the sea,
And down the shadowy reaches the tide came swirling free,
The lustrous purple blackness of the soft Australian night,
Waned in the grey awakening that heralded the light;
Still in the dying darkness, still in the forest dim,
The pearly dew of the dawning clung to each giant limb,
Till the sun came up from ocean, red with the cold sea mist,
And smote on the limestone ridges, and the shining tree-tops kissed;
Then the fiery Scorpion vanished, the magpie’s note was heard,
And the wind in the she-oak wavered and the honeysuckles stirred;
The airy golden vapour rose from the river breast,
The kingfisher came darting out of his crannied nest,
And the bulrushes and reed-beds put off their sallow grey
And burnt with cloudy crimson at the dawning of the day.

Here is my version of the Kookaburra in the early morning sunrise:


It is a die cut from Ultimate Crafts, die cut from black and then gold and the gold inserted into/replacing the black in sections


The sentiment is also a die cut  -  or two in fact.
The top one is die cut out of the white card and a second die cut in yellow inserted back in


I imagine (s)he is about to laugh at us all for missing such a glorious sunrise!


I found the instructions to make these sun rays on Pinterest
The inks are Tim Holtz Distress inks
I used a light yellow one first and then the darker one for the rays - working from the centre, and using the scrap paper to mask and  guide the placement of the rays - the distance between is just judged by eye...

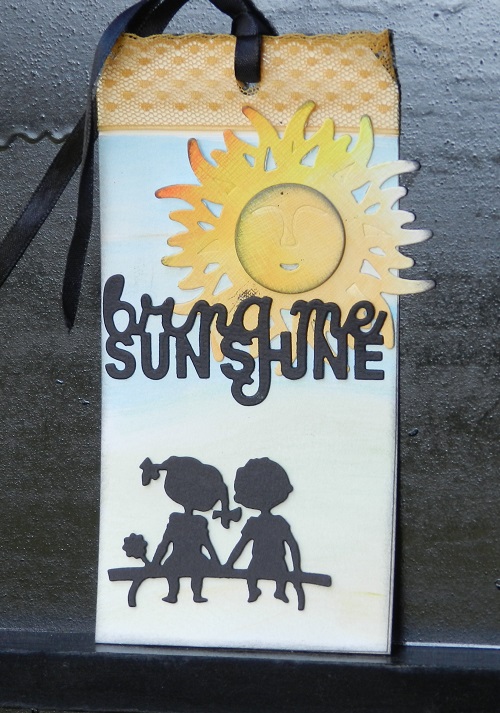
In addition, I made a cute tag 


The die for the sun  - by Inspire - only arrived a few days ago and I had to use it!
It is cut from some scrap card that has Dylusion paint on it
(Made for another project I will show you next week)


Isn't this little die so cute  - Siblings by Intricutz (Couture Creations)


This sentiment is a Tonic  die
The background is washed in with some Distress inks scribbled on a block and painted on quickly
Some lace on the top and ribbon for the tag


Fun and quick to make!

Now...
Why not go over to 

to have a look at the latest lot of inspiration available from the Design Team
for the current challenge - The Sun!

It truly is inspiring and there are many opportunities to win or be the DT favourite as there are not that many entries yet.......not sure why

Any ideas? 

There are so many photo's in the magazines of cards with sun's on them at the minute
Perhaps we are trend setters!!

I will enter these in the following challenges:
Inkspirational: Glow - bird card glows! So does my sun in the tag!
Art by Miran: Anything Goes - both
Creative Fingers: Anything Goes - both


Sunday 18 October 2015

Dragging my Heels.....


I am a bit slow of the mark making my Christmas cards this year - lots of ideas and things to use but just not that terribly excited about making them yet........

However, I saw one card in a magazine and was intrigued to make it - I didn't have the exact die but I did have a Memory Box one that would do the trick and so I used it x 2 to replicate the Christmas trees. I also die cut the bottom of the die twice to get brown tree stumps!


I took a strip of scrap white card and quickly used my Tim Holtz paint dabbers to create the striped colours. I die cut this twice.

I also die cut a piece of white card twice - and removed the insets


Then it was the fiddly job of replacing the rainbow striped  pieces for the removed white inset pieces

I swirled some TH ink around with water and 'painted' it onto the sheet of plain white card, aded the trees over the top and stamped the sentiment - SU and very old and no longer available.


You can see the one I CASED it from on the right
Now I know what to do, I could make a few of thee up quickly, using different colours on the trees perhaps.......simple and clean and easy to post!


Monday 12 October 2015

Am I in Dylusions here?

The answer is a resounding YES! I have been playing with these lovely paints......

I only have a few.....


I was making something else - you will see that much later, not today - and had some paint that needed to be mopped up or it would be wasted, so created these top two sheets, just using the red, yellow and orange.  I then at a later date stencilled/stamped them with black and blue as you see.


The yellow/green/blue one was created initially at the Paperific exhibition I went to, except for the  face, words and the sentiment, which I added yesterday.


I got them to a certain stage and then ran out of ideas until a very clever fellow artist Dee Fox pointed me in the right direction - this one I added some white highlights with a gel pen and the sentiment, and then mounted it onto black and a blue card blank.


The second one I am not that happy with but it is made


I NEEEEEEDDDDD a crackle stamp or stencil........


I have a big crackle stencil which I used as a sort of stamp for the middle one by dipping it into the paint and pressing it onto the card

The third one has used two Stamp FX stamps - strange things of orange on a heavy clear plastic back but they work beautifully


The doodle feather got some work with a white gel pen and some perfect pearls.....


The only reason the sentiment is added there is because I tried to stamp it directly onto the card, and stuffed it up so had to cover up the mess......I love the way the feather seems almost three dimensional......coming through the chicken wire.....

So, I learnt some more and had fun and made three more cards!

I will add this one to 

Good Morning Sunshine.........

......the earth say's Hello.......


No, wrong song! 
That was Good Morning Starshine!

Wikipedia tells me that 
"Good Morning Starshine" is a song from the second act of the 1967 musical, Hair. The song is performed by the character of Sheila.

Talking of starshine, look at this!

Aurora + Bioluminescence + Betsy Island, Tasmania from Wed night, 7th October.
by Ian Stuart

We have had some amazing displays of the Aurora in the last few weeks - who needs the sun when we have this to see!!

However, the current Challenge #51 at Unstampabelles is 


 the SUN - rising or setting, but always with 
twist of GOLD! GOLD! GOLD!

The prize for this month is this embossing folder


So, I thought of the rising sun, and did this


I used Stampin' Up Champagne glimmer paper and lots of glue!


I have a few word dies now and used them to effect too


The papers all come from a co-ordinating booklet from Graphic 45 Home Sweet Home and I found the pattern for the rays on Pinterest

It's a bit obvious for the sun but it was fun to make and it looks really sparkly and effective in the sun itself! Why not go off and have a go yourself?

at Unstampabelles

I will enter this in the following:
613 Avenue Create: anything goes
Suzy Bee's Blooming Challenge: anything goes with a twist of beginning with S - yep, that's the Sun
Polkadoodles: use a die cut - the words are die cut