Monday 23 December 2019

Last Week for Challenge at Unstampabelles for 2019


Merry Christmas Peeps!


Keep safe, keep cool (or warm) and keep ploughing on!

We are travelling well in Tasmania atm as the temp is only around the early 20's with some days getting to close to 30.  We have had minimal fires as well although it has been very windy.

Two day's to go until Christmas Day!

However, there is still time for you to make something for the 
current Challenge #96 at Unstampabelles

You have until Friday the 27th at midnight.

I needed another tag or three, and made this one up using a die from 
 Papertrey ink die set
Bethlehem Die
(contains three scene dies)


I used DP left over from Christmas cards; circle dies, ribbon from SU; and scraps of card
from the stash.

There is gold mirror card behind the stars and gold Stickles inside the biggest star


Some layered die cuts and a bit of white card behind it all for strength and so I can write on it.

I made another style for Bizzy Bec a few days ago (last post before this) and stamped that, but of course, no stamps for Unstampabelles. 

Cheers, and have a lovely day with family and friends on Christmas Day!


Wednesday 18 December 2019

Bizzy Bec's December Challenge - second post

Hi to all my Peeps!

Merry Christmas to you and yours!


This is the time of the year you are scrambling for tags for all those parcels. 
I know I am - so......
.....I made myself some using a Papertrey ink die set
Bethlehem Die
(contains three scene dies)


I used a circle die to make the big base (using left over DP from Stampin' Up)
 I didn't cut all round - leaving a small piece to form the top of an ornament
I cut a second piece at the same time in white card

I glued them together, with the gold string between the two pieces
I could use this then as a tag or as a tree ornament


I stamped the second die cut with black ink  using a sentiment from an old
freebie stamp set from a magazine I got back in 2017 - it was chosen for the size of the sentiment and that it fit the scene.

I used three dies to create the scene, cutting the first two in white card
and the last in white sparkly card!


Circle dies for base  lots of different ones available, try these
Bling and string from my stash
I used papers from my stash to complete the tag 
plus the sentiment is from a freebie set in a magazine. 


I cut a circle of gold card and glued it behind the first white one so the stars showed up.
I layered the three layers with dimensionals so they sat up from each other.

They are really quick to make once the pieces are all die cut - you can assembly make them easily.

Now, I got these and another set (Skyscapes) from Bec, ordered in September,
but I know they took a while to come.
They no longer appear on Bec's website but I am sure she will order them in for you.

Have a peaceful life before and after Christmas and enjoy the day with family and friends!

Monday 16 December 2019

Starry, Starry Night: Challenge#96 for Unstampabelles

Hello Peeps!


Hope you are all travelling well?
I am seriously better now although still quite tired at times
My word being ill is not for Sissies, is it!
So, with my Big Girl pants firmly in place, I have entered the craft space again.....

The middle of the December challenge at 

Unstampabelles

Star Struck Starry Night 
TWIST Use Sparkle Pens and/or Glues
(or make it sparkly!)

is here and I have created a gift bag - one of a few I need in the next week or two.
Wonder why?

Do you ever get beautiful Christmas cards and think they are too good to throw away?
Each year I carefully cut them up and put them away until next year.
Every year I pull out last year's cards and wonder what I can do with them.....
Sometimes I recycle them into new cards.....
Sometimes I use them for tags....
Lately I have been using them on recycled bags for gift bags....


The white bag was given to me with a purchase at some time - 
it is a bit thin so I added a background gold card
before I added the reused card front


This card was so pretty and has so much gold embossed onto it I could not throw it away


I added some bits of bling, a die cut gold star and the ribbon tie


Then I remembered the TWIST
use pens or glues to create more sparkle


So I added dabs of Stickles to some of the stars and made it even more sparkly.

It will not take a big weight but it will handle a book or calendar or coffee mug.

What are you making for this challenge?
You have until midnight on the 27th to enter

Monday 9 December 2019

Week 2 at Unstampabelles Challenge#96

Hello Peeps

Hope everyone is doing fine and keeping warm/cool and safe from fires and floods.

I have not been well for the last two weeks and on top of Christmas prep and cards, I have found life a bit of a struggle but I must say today is much better. Might be related to the weather too - we regressed to Winter for the last two weeks but today is Summer again with NO WIND.

I have had time to play in my very messy craft space today - and to do a bit of gardening as well!


The challenge over at Unstampabelles this month is to create a Starry, starry night

- the TWIST is to make it sparkly with glues or similar.
I cheated today and used glimmer paper.


I used some die cuts from last year's catty at Stampin' Up
Starlight Thinlets


I started with four small white tags
Using inks from SU and a sponge, I coloured them up

I used Seaside Spray, Terracotta Tile and Blueberry Bushel
to create a starry night sky and sprayed them with the water bottle 
to give a starry sky background.

I die cut four detailed stars from glimmer paper and four plain stars from gold
Using Tombow I glued the detailed star to the plain


I found the blue ribbon in my stash
 - from the various clothing pieces I have purchased I assume.


A small star sticker at the top finished them off.


I simply wrote on the back of them


They do look so pretty
especially in the sun!


What are you going to make for this challenge?
Remember, no stamps and you have three weeks to go!

Thursday 5 December 2019

Merry Christmas for Bizzy Bec

Hi Peeps - hope all is going well with you and yours

Today a new challenge opens over at Bizzy Bec's

It is as always 'Anything Goes'
but the TWIST is to be sparkly!

I used a stamp I have had for a while now, saving it for this month,from Penny Black
I used my Promarker's to colour - haven't used them for months but they were out so I used them!

I used Tim Holtz inks to create a moody background


Penny Black - Pointsietta Spiral
(If not there, ask Bec to order it in)
Tim Holtz inks - Stormy Sky and Old Paper
Coloured with ProMarkers
Front covered with Pan Pastel (coarse) white for shimmer effect
Stickles added for glitter effect
Other inks, gems and background paper from my stash


The poinsietta flower was stamped twice, coloured twice and then one was fussy cut
to be layered on top for some dimension
You can also in this shot sorta see the shimmer the white Pan Pastel gave the image
It is soft but lovely


I used old stash for background papers and some gems as well
The sentiment is from one of last years SU sets


I also painted on some Stickles (Icicle) to give some glimmer points of gold sparkle

It looks all soft and pretty

Happy Stamping!


Monday 25 November 2019

Final Week for the Challenge #95 at Unstampabelles


The challenge blog Unstampabelles is nearly over the current monthly challenge #95: 

 Paradise Pretties and/or Tropical Delights  
TWIST  Into the Wild


There is the usual prize for the Random Number Draw

$15 Aust
Image result for gift card design
(Paid through Paypal or as a voucher in a store of your choice)

I made another card

I used up lots f left-overs with this in an attempt to clean up my working space
 so I can get to the task of making Christmas cards

I cleaned up some bits but am still working in a miniscule space as I have "stuff'" everywhere.....
too important to throw out apparently!

Anyone else do this to themselves?

Anyway, first photo was taken in the daylight but out of sun


Second photo in the sun so the colours are soooo bright...


Still have some flamingo's die cut out but used all the flowers and embossed card up.
Obviously the flowers are going wild around the flamingo's as they do in the tropics!

Let's see what you can make from the scraps around. 

You have until Friday at midnight to enter!


Wednesday 20 November 2019

Stampin' Up 3 ONLINE Extravaganza


Check what is being sold 


Email me if interested in papers, inks or any of the 8 bundles on sale. 
If I get the email before 6.00 pm  on the 22nd (this Friday)
I will order for you.
I will be doing an order for myself around then.

(Australian customers only  - sorry)


Monday 18 November 2019

Happy Birthday Jack

Jack is my only Grandson

He was born in Colorado 14 years ago on the 18th
- however, it was the 19th here, so I always think of his birthday on that date!

Teenage boys become pretty proficient at 'Grunt" in the early teens, so I am assuming he will understand the sentiment....... 

I made this for both Jack and Bizzy Bec's Store Blog
as it was my turn to present.....


I used Kraft card and coloured with Copics - but it didn't show that well
The bird is done on XPress card and fussy cut and the colours are clearer - as in not as muddy.


I do love Time Holtz!


Inside the card I used these images from a freebie stamp set.
The sentiment is SU


Jack plays hockey and goes to the gym.......


I used: 

Tim Holtz Bird stamps and dies
(as I coloured with Copic pens)
The hat and balloon are also Tim Holtz - Crazy Things Collection
(just ask Bec to order them for you)
The card base is Kraft card
I used a fine black pen to outline

The two stamps - bag and hockey stick - are from a magazine freebie set (Practical Publishing)
 called A Good Sport

The sentiment is made from lettering stickers
- but could have been stamped with alphabet stamps

Don’t forget to play along in our current challenge, the theme is always anything goes 
and you could win five digis of your choice.  

For more inspiration follow us over at Instagram at BizzyBec3


Week 3 of Challenge #95 at Unstampabelles

Paradise Pretties and Tropical Delights  
TWIST  Into the Wild

I made a tag for this week....


It is quite a big tag made with scrap white cardboard from packaging and cut to size
The front is about a standard Aust card size plus the top


I started with some tropical flowers from a Prima wooden flowers set I have had for ages
Opened it especially!


The I went to my Embossing Powder stash and located all the bright EP's I had
I havent used anything but black,white and clear for sooooo long....

After I juiced up the Versamark I added powder and heat set them 
I now have EP all over the desk and floor and cat!


He was not impressed - hiding in the only spot of sunlight now....
get outa my face Hooman....

 I tried an arrangement for a card front but decided I would then do a tag
I added some extra jungle leaves (Christmas tree boughs, actually) behind to give the impression of a wild and overgrown jungle garden....


Once I was convinced that they would look OK en mass like this I began to glue things down


I created my tag and stuck down the background papers - from a freebie in a magazine

I used glue dots to anchor the fronds in a circle and then 
added several more fronds into the middle as well later.

Once I was happy with that I added it to with a pen and some sparkles and then a sentiment


This one comes from an SU die set and I used Tombow to glue it down
I also swiped some yellow ink around the edges - in this case Hello Honey from SU
I scribbled around the edge with a fine black pen too


The ribbon comes from some flowers I got several months ago and was just the 
correct colour for this

I wrote a big To and From on the back 
There is plenty of room for a message also

I had fun with an old technique, got to use up a bit of stash and added to my big tag collection
People really like the tags rather than a card sometimes

(If you add a piece of plain paper to the back and write on that, 
it can be removed and they can recycle if they want to another person.)

You have two week to go
Hope all is well in your part of the crafting world

I know that many are suffering under floods and fire atm
Soooo sad and too sad for me to discuss this week. 

Take care, 
Susan


Wednesday 13 November 2019

Creativity IS FUN!

Hello Peeps

You may have noticed that I did not have a DT piece in this week for Unstampabelles.  I was busy on Saturday at a Craft class with the fabulous Sue Symthe and this sort of fell over into Sunday for me as well as I was making up for lost time at home and with hubby! So, while I did make something, I didn't make it for Unstampabelles this particular week.

What did I make?

Well, I made several things.....I will show you some

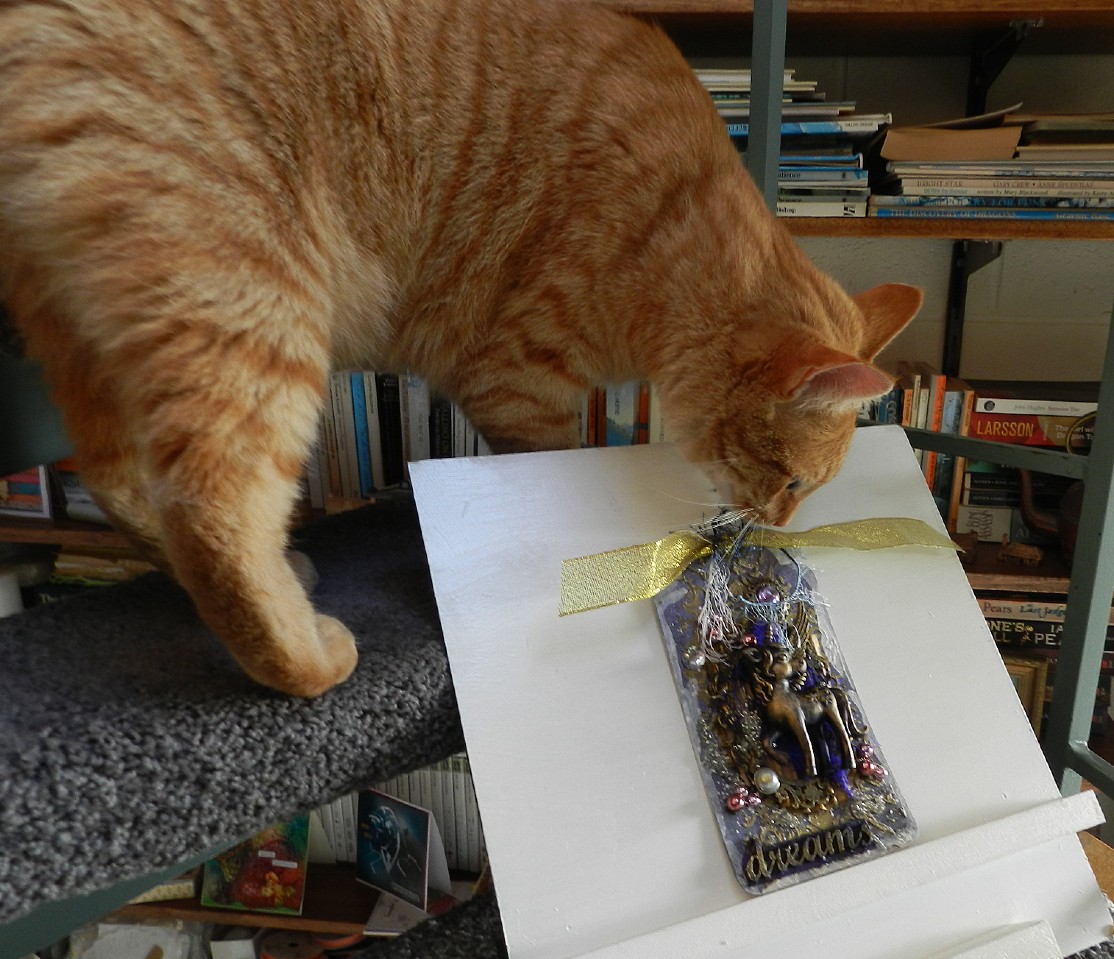
Last month I went to Paperific in Melbourne and made a tag with Sue in a class


It is a Unicorn Tag
She provided everything there - tag and ribbons and wings and jewels and paints and potions.
There is texture paste and stencil work, painting of chipboard and gluing down, adding waxes and layers - i.e. the purple behind the unicorn is material - and the unicorn is an eraser purchased at a $2 shop apparently!

There is lots of glitter, gold bits and jewels on this and lots of Gel Medium and gold waxes

I had trouble photographing it - mainly because of the weather (it was raining here) 
so used the spiral stairs - or tried to use it.....


Weasley thought he should be part of it all too!

Izz did not knock one of the houses down Human - must been somfing else did it.....Izz was just
sittin' here mindin'  meez own business.........

I tried outside later and got this one...


However, on Saturday we first decorated a glasses case


It is amazing what black Gesso and tissue paper can create!

The back or bottom of the case

Then we went on to decorate the cover of a small notebook


It is the white rabbit from Alice
Sue made the rabbit in white plaster using a mold and we painted it with black gesso and then other colours were added with waxes and gilts and paints


The background was torn playing cards and lots of Gel Medium plus Black Gesso
The texture is amazing in the end.


It is all held on with Matt Medium and Dimensional (or in my case Crystal Effects)


The back is very grungy and the spine is just black jewels glued on and then painted!

It was so much fun!!!

In Melbourne last month I went to another class as well and made an album
from a paper bag!

This is the finished outside on that day


The spine is a very interesting collection of white folder strips of paper, blued together to form a spine - the papers are then attached to this! 


The album used old DP and a few bits and pieces of of ephemera 


We did quickly paint the inside of the bag with a very thin white gesso
You could do the same to the outside or make the gesso thicker
We didn't have much time to wait for things to dry


The album pages varied in size


...and kind...


The inside back page - not the bag bottom is under there

You could add as many  pages as you wished - I think there are about 16 in this one.

I didn't like it that much to start with but it has grown on me since making it....

Happy crafting!!!