Wednesday, 28 March 2012

Who is the Easter Bunny?


Lollipop Ladies have a new challenge! This one is around the wonderful old-fashioned lollies called Fruit Loops, with the added challenge of using glitter!

Remember Fruit Loops? 
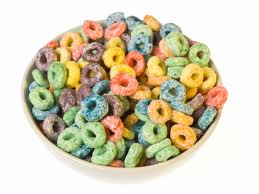
  Slightly tangy and acidic - eat too many and your tongue gets sore? Addictive?


This is my take on them! Bright colours with a lot of glitter! The little bunnies are actually peel-offs (Cartongraf Spa 201), put onto one side of double sided tape,  covered with fine glitter, and then coloured with Copic pens (carefully and the pens are cleaned up afterwards to get the glitter off them!).  The top bunny is covered in gold glitter - he is obviously top bunny! He is dishing out eggs to the two bunnies underneath! The background is stamped using SU pens to colour the stamps, and the sentiment is from the same set - SU Just believe. I had been taking a Copic colouring class at a local shop and heard from one customer the trick of peel-off, glitter and Copic pens so just tried it - firstly on some little birds and it was very sweet and subtle, but the Easter card is much brighter!


This is the peel-off and the Copic pens and the bunnies after I had coloured them, and stuck them on white card and then fussycut them out!

Stamped background and die-cut clouds - I ended up only using one! The background was airsprayed with a blue Copic pen beforehand. 


The whole topper was then mounted on bright pink glitter card background, gold card and then onto a black folded card. The sentiment is also backed onto the glitter card. I mounted everything on dimentionals as well to lift them from the background.


Wednesday, 21 March 2012

Happy Birthday Blog Hop for Merry!

Guess whose having a birthday this day?  (Yes, yes, I know - million of people; but none are as important as this one right her/right now!)
It's our own UnstampaBelle herself


Happy Birthday Merry

Here's a little birthday cheers for you!


AND that's not all - the rest of the Belles are hopping as well today with joyous wishes, so why not follow the link and then go to Merry's own blog and leave her some love!


The little cupcake has some sparkle on it and some paper pieced icing. The icing is also added with dimension to lift it up.  It is coloured with Copics. It is a Verve stamp set - Seize the Cupcake!


The little card the image is on has been embossed with Swiss Dots and sponged with SU Tangerine Tango ink.  The sentiment  is Seize the Cupcake from the same Verve set, and has been stamped inside using the same ink.  The card is SU Whisper White.


The small white card has been layered onto a piece of SU Daffodil Delight, which has the sentiment Happy Birthday punched out using a Martha Stewart punch. This is also sponged around the edges with the SU ink. 


Behind the yellow is a pink doily sheet from SU. Under this is a yellow sheet also of doilies, from SU.  These are from a set called Flirtatious Speciality.  The icing is cut from a paper from the same set.


The card itself does not have an inside, but a stand at the back made from a folded piece of card attached. There is a place to write inside the smaller card!

 I am entering this in the CR84FN Challenge #50 - colour challenge - pink, yellow and orange!

Sunday, 18 March 2012

Easter is on the Horizon

...and can no longer be ignored! Hope all you blog readers had a Happy St Pat's day, and that the fairy visited you with good news!

I have an Easter basket that I made from a template I got at Waltzing Mouse two years ago.  I admit this is only the second one I have made and they are not as easy as they look! Anyway, I made it for Merry at  Unstampabelles to put in the blog as a mid-way DT project. I admit I was a bit late getting it up there!  Hope you like it!

I am going to enter it in the following Challenges:
My Sheri CRAFTS: Easter
Craft Us Crazy:  RELIGIOUS/EASTER and/or SOMETHING SWEET!! 
Crafty Ann's Challenge Blog:  anything to do with Easter or Spring


The card used is from Stampin' Up and is in the colours of Delightful Daffodil and Marina Mist.  The edge punch used is from Martha Stewart and as I said before the design is from the House of Rodent! 


The handle is too wide and when I fixed it in, I first cut off the decorative edge on the two sides where the handle fits - it looks very strange! I had to recreate the edging for those two areas.  It is all held together with SU  red Sticky Tape and appears to be quite strong. 


The chicken was a purchase from a $2 discount store and I got three of them, and then another 9 (3 of different colours) in another pack, slightly smaller than this one but for the same price - bargain! The eggs are  Darryl Lee ones - but from a big pack of Chick Eggs; I only used those that matched the colour scheme and the rest were scattered about on my work table.  I noticed when I came downstairs this morning that several small pieces of empty tinsel paper were also scattered about - courtesy of the DH I suspect! I had better put them away - I cannot eat chocolate (although I dearly want to) as I have developed an allergy to it - yes, very sad indeed. I like the smell though and that doesn't seem to cause any problems!


Wednesday, 14 March 2012

Maltesers with a hidden message!

Do you know those round chocolate covered balls of honeycomb? I am not sure if they are peculiarly Australian or not. Whatever, they are very yummy and one of the many reasons I rue not being able to eat chocolate these days - although if I opened a packet back in the day I would have a tendency to eat all of them in one sitting!


Challenge #40

The picture is to inspire you and the challenge also incorporates 
something hidden


My card is a male card. I have made it a Thank You card, and chosen to play around with the colours chocolate, caramel and honeycomb! The hidden element is incorporated in a gift card holder I have attached to the front of the card, under the sentiment.


This gift card holder comes from a tutorial on Splitcoaststampers created by Jane Matsumoto for a Slit Latch Gift Card Holder, which was as a stand-alone.  However, I used it as the feature on the front of the card. I did change some of the dimensions slightly to make it look a bit more balanced on the card. 


The only card I had to hand was an old membership card, so I used that as my template. As I had made the whole thing a bit wider, I had to put the slits on the bottom (using an SU punch) rather than on alternative corners as Jane had it. Apart from that it is the same. 


When the latch is off, the front opens to show the gift card inside. 

To create this card, I stamped randomly (this is so hard for me to do!) with three different inks - Memento Rich Cocoa, and Desert Sand and TH Distress- Tea Dye onto a piece of SU Whisper White. I used the circles from a JudiKins cube stamp called  thin lines. I sponged the edges with the Rich Cocoa after cutting  them to size. I mounted the WW onto SU Creamy Caramel (old stock).  The card base is made from SU Chocolate Chip. The gift card holder is made from a folder piece of Scenic Route Paper Co - Harvest Multi dots. This was cut to a 10" strip which I made 3" wide. I added some ribbon onto which I had stitched a button (from my mother's button box!) with some twine (SU). I cut a slit from corner to the middle and in about 2" and did the opposite side on the base sheet. Instructions are in Jane's tutorial. You only need sign in or join to get them - no costs! The slits to hold the gift card are made using a small SU slit punch. 

The Sentiment on the front of the gift card holder is also from SU- Just Believe set and I fussy cut around the frame, after stamping it onto WW with some TH Distress Forest Moss. The sentiment itself is stamped with Tea Dye. When the gift card holder was complete I stuck it onto the card over another piece of the background I had created, mounted on the Creamy Caramel and then onto the base card. Inside I have created a layer of card, from the DP, created background, CC and WW last to write on!  Take care not to stick the actual gift card to the base when doing this! 

Hope you like it!

I am entering this is the following:

Polka Doodles Week 10 - Do it for the Boys
365 Cards - Day 8 - Circle Up


Monday, 12 March 2012

March Challenges

I went to look at a friends blog ( Hi Tillymint!) and saw that there was a challenge going on at Scrapbook Boutique  so of course I followed the blog hop and decided to enter the challenge.


The Challenge:
Inspiration : 

Challenge : Create a project using the photo as your inspiration and to include at least one handmade flower.
The project can be a card, a scrapbook layout or off the page project......it's totally up to you!
Stamps :
NO Digital stamps please
The Prize :
One randomly chosen winner will win a $30 Scrapbook Boutique Gift Voucher.

My entry is another one of the background cards I was waffling on about in the last post. This one used alcohol ink and one of those felt pad thingys to move it around on some SU Glossy White card, while the stamp set is a TJ Designs Rubber Stamp Set - Song Birds. In some packages you get white wrap-around stuff to cushion it and I took this, cut it inot circles, died it with the alcohol ink in water, added a pearl brad and made two flowers.  

The colours are in that blue/teal range although they do not quite match the pretty blue in those lovely cupcakes! Sorry about the poor photo quality.  


All the card is SU, and the inks also, and blue lace (under the sentiment) was from an old nightie of mine when I was a child!

Sunday, 11 March 2012

Long time, no post!

Sorry about that but I have been having quite a social week and didn't have time to post as well! We have been hosting my husband's nephew and his wife for a week - and they were very easy to look after and pleasant to have in the house. We enjoyed their visit greatly but drank too much and ate too much...... you know how it is when you have guests!  In addition I have been to an International Woman's Day breakfast  - where the author Judy Nunn was the guest speaker.  Great speaker and lovely breakfast. Then a friend had a birthday last week but was away so we had put off the lunch until this week ......you can begin to see why I had no energy for work!

I did make some cards earlier last month and have not posted them so I thought I would share one or two of them! Can you remember when I mentioned I had been experimenting with a new mask, and would use the result to create something?


I am entering this in the following:
Hotshot Craft:  Ribbon


This one used SU Dye inks sponged on over the mask.  I die cut the vine and the bird and cage, stamped a Verve sentiment and added some lace trim and mounted it onto a piece of purple card that had been punched with a Martha Stewart bird edge punch. tow Kaiser brads were also added.  I wrapped the side that I added  the brads to around the back of the card for about 1". I was pretty happy with it. The card base is a large 14" x 14" shimmery commercial blank.


This one was created using Tim Holtz Distress inks, which I then sprayed with a gold mica to give a lovely shimmer. The corner die cut was painted gold and I added some ribbon, a button, some flowers, a die cut spray and an embossed diecut butterfly.  Again the sentiment is from Verve. This is all mounted on blue and then gold card and onto a commercial card base. 

I am entering this one is the following:
Crazy 4 Challenges:  - C4C147 #Spring is in the Air
The prize this month is fantastic!
You can win:
* A Marianne Design Butterfly Die.
* Anita's Flitter Fairy Wing Butterflies
* Kaisercraft Wire Flutterbys
AND
* Some summery orange/yellow buttons.


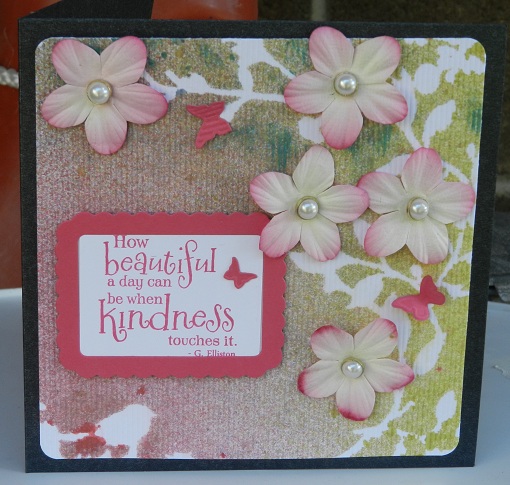
This one is the base that was created with all the spray bottles. There was leakage under the mask around the bird. I just added commercial flowers with pearl centres, and two small butterflies cut using a Sizzix die from SU. The frame is an SU punch and the sentiment is a Verve stamps. The corners of the card were rounded and it was layered straight onto the black shimmer card base. 

I am entering this one in
2 Sisters: Spring colours

Sunday, 4 March 2012

Show Us Your Flowers!

My first post as a member of the Lets Ink It Up Design Team


and the Challenge is to 

Show Us Your Flowers!


Challenge # 21- 4th March to 26th March 2012

Challenge - SHOW US YOUR FLOWERS
Flowers may be handcrafted or shop bought.
Use your imagination

Prize package consists of the following

2 sets Handcrafted fabric flowers
(great to add to a handbag, brooch etc)
1 Pack white Prima flowers
1 Pack 1" Ivory Tea Roses
1 Pack 1" white foundation blooms
1 Pack 1" Rose Leaves

My contribution to this month's challenge is a decorated glass slider folder from Papercraft - and involved a lot of fiddly stuff.  This is the order of doing it but the time frame stretches over several months.


  • Some time ago I purchased some glass slides - they sat in the cupboard for a loooong time
  • Before Christmas I played with alcohol inks - one of the things I did was put the ink onto two glass slides (the brighter coloured slides). I also put some ink onto white card to clean up the applicator - that's the card under the other two slides. These sat on my desk for a long time too.
  • I purchased two Kaiser stand alone stamps:  Parade and Deco Lamp - Parade is a line of 20's flapper girls and the lamp is an old-fashioned art deco style lamp - I had an idea I would stamp the slides with the Parade girls but too fiddly for me!
  • I have been trying to use up my very large supply of background papers before I purchase new ones (a bit of a lost hope that) so earlier in February I scrounged out a set of 12 x 12's of Keeping Memories Alive called Dirty Laundry and used them to cover the folder and make the flowers.  I sanded all the edges and then inked them with Tim Holtz Distress Inks of various colours
  • At this stage it became apparent that the middle join was not sturdy! I used some white material tape I have to bind it, after distressing it with various inks and the Annabelle Stamp set called Fanciful Flowers and Memento London Fog ink. I also stamped the sentiment at this stage using this set.

  • I used this same ink to stamp the lamp post and to stamp various borders from a set called Grunge Corners by Lily Of the Valley
  • Meanwhile I had stamped the Parade set onto SU Whisper White using Memento Paris Dusk. I carefully fussycut out two ladies and stuck them onto the glass slide the same side as the alcohol inks 
  • I stuck a piece of white card behind them
  • I got two clear slides and attached them to the white card I had cleaned up the alcohol ink applicator on, and trimmed around the edges - they have the same colours but more muted.


  • Using the computer I generated a conversation between the two ladies and then distressed the card  before cutting it out and adding it to the top of the two clear slides: then I put all four slides into the folder


  • The problem is of course, the slides run east-west and the card is north-south! Anyway, whilst doing this I cracked one slide! Bummer!


  • Then I made a whole lot of flowers using various dies and the same DP and layered them onto the front of the card - the dies are: two Marianne Creatables (LR 0108 and LR0196) and two BossKut dies - large daisy and wild flower cut out.  The leaves and fiddly bits come from the Marianne dies.


  • Two Kaiser brads and  two flower centres (one coloured to match with the trusty Copics) from Prima completed it. 

What'cha think?

Easter and Folds


Unstampabelles March Challenge

Easter theme with an added bonus entry for extra folds!

Sponsor is 

March - Theme Easter, bonus technique Extra Folds (more than one fold)

 and the prize is all this!
                                                   Prize Pack for March

This month the Belles have been busy creating Easter Cards with extra or different ways of folding the card. Except I didn't! Sorry, but I was too busy embossing and die cutting and stitching and glueing.......


I have had this idea for a while but when I tried to do it, it just didn't seem to work as I had envisioned it in my poor little head. 

The card for the eggs is from a pack of shiny A5 card I got at a Paper show in Melbourne last year, and I used the Spellbinders die set for Easter Eggs that matches the stamps from Waltzing Mouse to cut our the eggs in differing sizes, after I had embossed the various sheets with different embossing folders to get patterns on them to look like Easter egg papers - all that one sentence!

I stitched (this is mighty for me!) the white card onto the SU Pool Party card and also stitched some of the yellow (recycling again) nylon waste orange bag stuff I have in the stash. After I stitched it I cut it and fluffed it up a bit to look more like straw!

I cut out the pennants using the die set from spellbinders called Nested Pennants (and the flag banner for the top) and embossed them.  While they were in the die still I inked them using SU Barely Banana ink. I then stuck on some pebble letters (Crafts Bubble Stickers) to spell out the sentiment. 


I strung some yellow paper string (from the stash) across the card and secured with two SU Pool Party brads. I used dimentional stickers to place the pennant flags across the string to spell EASTER.

I added the little bunny last - not sure he belongs yet...........

So, why not have a go at making a card or an item related to Easter with lots of folds involved!  And enter it into Unstampabelles March Challenge! 

Wednesday, 29 February 2012

Snakes and Curves

Time for a new Lollipop Ladies  challenge.

This one is all about those lovely chewy, juicy jelly snakes.  Who eats the heads first and who chomps on the tails first?  Go on, hands up! I'm a head girl myself - don't like the idea they might whip around and bite me before I get too far ;)


The additional challenge to this image is 

CURVES


My card based on a commercial blank 14 x 14 card from Big W; the DP used is from a Basic Grey Hullo Lucious Paper Pad. The card used is all Stampin'Up - Bravo Burgundy for the lace, Lucky Limeaid for the background and Whisper White for the stamped image. The lace is an SU punched strip. There is a scrap of yellow used too - not sure whose. The stamp itself is one I have had for a long time and got from the UK - not sure of the maker.  The ink used to stamp the image is Memento Black. I then stamped the sentiment in Tim Holtz's Distress Ink Tea Dye using a sentiment from Annabelle Stamps set All Things Grow, and used another SU punch to punch it out!  This is also used to distress the white card and other TH inks are used to colour the image using sponges and care! I used a technique I saw demonstrated on Stamp, Embellish, Create by the talented Kylie.  However, instead of using a crayon, I used the sharpened end of a small white candle to cover the faces of the children in wax, and to put in other places that I wanted to stay whitish. I then sponged the Distress Inks all over the image and rubbed it off the areas with the wax with a tissue.

It is finished off with some Annabelle Stamp Sprinkles and a bit of twine. The curves in mine come from the sprinkles and the lace strip, and the colours reflect those of the lucious jelly snakes!

I am entering this in the Annabelle Stamps Challenge for this week, which is a sketch!
As well, I am entering it into Celebrate the Occasion Challenge  - Birthday Card and
Colour Q challenge has the same colours I used so I will enter that as well!


I like the distressed look it has and the colours remind me of childhood (remember, mine WAS a long time ago!) .

Now, stampers - your turn. Why not make a card or item and enter it into the Challenge.  You have until March 15th to enter.  Do you good! Reminder: no digi's in this one. 

Tuesday, 28 February 2012

My Hubby is wonderful!

Most of the time.

He has created for me a new cupboard - all off his own back and at no request from me - to house my computer tower and new printer and with some addition storage space for papers and things related to the computer!  See!


Before - with old printer and new storage space (white cupboards)


Now, with new white printer holder thingy, and desk hubby built for me 28 years ago. (Yes, I took that picture on the computer screen - its of Pompeii and Mount Vesuvius) 

Close up of computer stand
Now you know why today he is wonderful!