Saturday, 31 March 2018

Crafting with Dragonflies has it's moments!

Mostly caused by me! I am late again - of course. I have made my card for the challenge now though and will hope that the recipient does not see this before tomorrow!

Meantime - Happy Easter weekend!


Hope those bunnies begin hopping for you early tomorrow morning!
Remember, chocolate is NOT the reason for the season - 
but it makes our hearts happy!

Hilde want's us to make a Criss Cross card with a tag

Not sure what that was? Neither was I but Hilde sent us to a good tutorial
She has put the link on the main blog at


Now, my card was made for a birthday
That person has recently acquired a new Springer puppy
Her daughter has got one too - and like all good children is still living at home
That means there are two puppies to be house trained.......and create chaos!
Not only that, there is already a dog at the house - Sammy's nose it a bit out of joint too

Then there are the three cats.......they really didn't want this to happen!
The good news is that daughter is moving house soon - there is just a cross over period...
.....and chaos!

So - a criss-cross card is suitable!


I used SU Designer Papers and some glittery tape on the front
TH's Crazy Animals came in usefully here.....


Coloured with Copics - Maggie is a tri and has orange eyebrows!
She belongs to the house and will stay


The tag inside is the birthday message


I had fun with pixie powders to create the chaos look!
The brother is called by me Mr Fat Bottom!
Sammy is a King Charles Spaniel


I had to mask and stamp a few times here

After all that chaos - here is a tranquil scene of Autumn beauty in Tasmania


The drive through the rolling hills of the Huon Valley, in Southern Trove Tasmania, is super scenic, with orchards and wineries. In autumn, the golden heart of the apple isle is next level picturesque! Go for a stroll along the river and enjoy the colourful reflections.

http://hobartandbeyond.com.au/news-posts/shes-golden-love-10-spots-to-visit-during-autumn/
Image: instagram.com/alexdwheeler


Monday, 26 March 2018

#77: Decorate Wood Challenge at Unstampabelles is coming to an end.....

And who can believe that March is nearly over as well! 


Unstampabelles still have a week to run on their March Challenge
Decorate something Wooden

So, for this week I decorated a wooden box of sorts......
It is a garden Box - to contain small hand tools, gloves and seeds, and twine so you can take these things too and fro to your garden bed easily. 

I got hubby to make it from some old timber
My design and his work
It is rustic in appearance....


The centre will be for seed packets


I gave it two good thick coats of  white acrylic paint
Once it was fry I began to find and apply some old rub-ons and stickers I had


The stickers will not stay on for long but they added a fun element


Both sides of the box I used a foil transfer to create some interest and make it feminine 


These foil stickers have been hanging around for ages - they are actually a cross between a rub-on and a sticker overlaid with some pink foil 


The ends got rub-ons added


Just for a bit of interest really


This is to be a gift for Easter so I will purchase the gloves and tools and seeds and fill the box up with Easter goodies too - I had fun creating the idea and decorating it and I managed to do it without the cat getting in the paint!


Here is some more inspiration for you


Here is some wood decorated with a beautiful autumn sky and green grass

Lake Leake Road at Campbell Town thanks to Leanne Hays.

www.instagram.com/wombat_at_80

So, why not go over to Unstampabelles, look through the DT work (it is exceptional) and get some ideas and then submit your piece(s) for the challenge

Saturday, 17 March 2018

Crafting with Dragonflies wants us to celebrate Easter!

As you are probably aware, Easter is coming! 


Hilde over at Crafting with Dragonflies has set the theme for this challenge at EASTER!

My card is made with all Stampin' Up goodies:


I love this intricate die of a cross
Also a die for the wine but I am rubbish at getting it to sit still when cutting the stamped image


Remember that gorgeous embossed paper - I had some left over
I rubbed some Hello Honey ink over it all to bring out the vine


Mounted onto gold card and then a commercial white blank

The sentiment is coloured with a Typo pen!


Here is some cuteness to get you through the next two weeks!
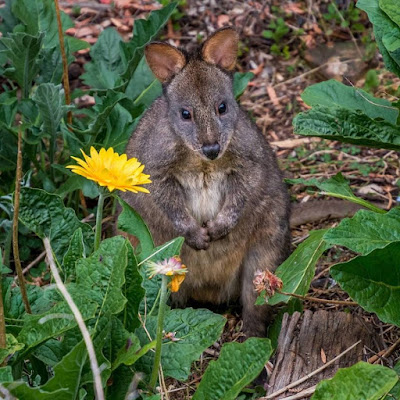
Pademelons are primarily found on Tasmania


A seriously cute pademelon joey thanks to Christine Booth at Tin Dragon Trail Cottages who says:

This garden visitor is one of the reasons why I have given up on having a tidy house garden. I now host a small family of 3 pademelons including the cutest joey.

www.instagram.com/tindragoncottages

http://www.tindragontrailcottages.com.au/


Monday, 12 March 2018

Week Two for Challenge#77: Decorate Something Wooden

Decorate something wooden ..... with what?

Here is a tree decorated with moonlight....


A truly beautiful image of the Tasman Bridge (Hobart, Tasmania) thanks to Steve Hansen.

www.instagram.com/steve.tassie.photos


I have decorated my wooden things by placing a layout around them!

There is also paint rollered over a textured card - it was created with left over paint ages ago and the sheet itself has been floating in my stash, waiting for something to use it on!
It is not perfect so very suitable for a small boy - I like the texture it has.


The wooden stars were too crisp to spoil!


I did paint some white card stars


Love that lusciousness of the Dylusions Paints


I used the paint on a stencil as well by pouncing the ink onto the stencil - again, not perfect but OK
Lots of washi tape used too, always a good thing!


Layout before I made it up - just playing with a kit newly arrived from D'Lish Scraps 
It was serendipitous really that it had wooded stars! They were all stacked when they arrived. 
The kit is called "Boys Rule". I love the star stencil....there is often a stencil with the  kit and I have now got quite a lot of them from D'Lish - very handy.

My journalling is on a card inside the black bag behind the photo.

When I find the layout I like, I take a photo to remind me of where I wanted stuff to go and refer to it when gluing and painting and such. It doesn't always turn out the same but it gives me an plan to work to.....


The backing paper is an old DP set from SU and the strips of alternative paper were from the same set. 


Awesome and Wow were some of our Grandson Jack's favorite words away back then! I think he is still inclined to use them now he is 12. 

With the kit this layout came together very quickly


Monday, 5 March 2018

Working in Wood!

Hello Peeps  

Do you have helpers in the Craftroom?
I have recently acquired one - 


"You put the paper in here Mum and then spray it right here!
Wait for me to gt out first OK? Oh, what is this doing in here -I will just remove it!"


I'm a Big Shot with a Bigshot!

When Mr Weasley is not helping me with spraying and painting, he is stealing my bits and bobs and running away with them or sitting on the keyboard or the printer supervising. Every job seems to take twice as long!

I had to use a box to spray stuff this week - and this is why......

The challenge over at Unstampabelles is to 

Decorate Something Wooden!
There is also a prize kindly donated by Dale!


Mmmmmm

What exactly does all that mean?


I have a wooden spatula - can I decorate that? 
I have lots of wooden embellies - can I use them?
What about wooden buttons?
Can I use a twig from a tree?
What about an old box that needs rejuvenating?
Perhaps I can build a box or frame or similar from scratch?

The answer to all these questions is YES

Goody - I have a sentiment - from Kaiser


First I painted it white and then I added all sorts of stuff but the last layer was two different colours of Starlight Metalic Paint from Imagination Crafts - Aqua and Chestnut


The TWIST is the use paint

Does the paint have to go on the wood?
Do I have to use paint on everything?
Will I necessarily have to use a paintbrush?

The answer to these questions is NO

Great! I used my fingers and an earbud!


Some pretty DP from SU (old stock) and a Dark Room Door image, fussy cut, Gold pen and some stencils and black ink, some packaging card and a frame that started out quite ornate but got cut down to fit the tag!


Ribbon, flowers (Prima) and butterfly stickers to complete it!


The tag was cut out of an old manila folder. 

There you have it - a wooden piece (and some paint) used to make a tag for a birthday present!

Why not go over to Unstampbelles and see what else is there and then enter the challenge!
Double Dare YOU!


Saturday, 3 March 2018

Feathers and Autumn

Hello Peeps - another lovely autumnal day here. Hope your day is going well but from the photo's coming out of the Northern Hemisphere, it looks a little cold!

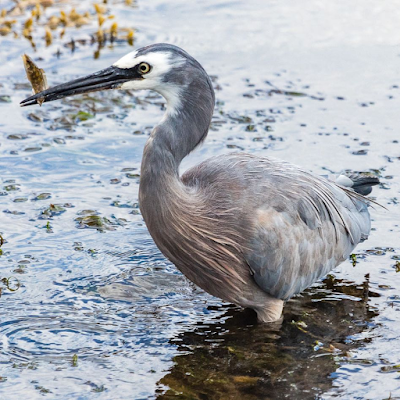
This heron is not cold - the opposite I would say, as it was taken early February


WOW… what a great shot of a White Faced Heron on Bruny Island (near Dennes Point), just having caught a fish thanks to René Pianezzi.
www.instagram.com/renepianezziphotography

Hilde at Crafting with Dragonflies wants us to use birds or feathers in our card 
this fortnight for Challenge #98


I was given a beautiful card for my birthday last year by a friend, using a photo taken by Michelle Pears, from Sorell, Tasmania. The photo was attached to some lovely silvery card - I thought it was a shame for this to sit in the drawer for the rest of my life so I repurposed it!

I cut the card front with the photo off and stamped a sentiment using StayzOn ink (blue) and a stamp from a set called Vintage Springtime by Beverly Tonks. 


I used the back of the card to die cut some feathers - I have a number of feather dies now and this is a selection.They are attached using a grey brad.


The card is SU Early Expresso - I carefully peeled the sticker of the previous card and reapplied it to the back of this one, and wrote above and below to indicate that while the photo was not mine, the rest of the embellishment was. 


A card suitable for a male going through a rough time perhaps 
or a young person needs a bit of a boost. 

You can go over to see what the rest of the Design Team have come up with!

Thursday, 1 March 2018

Upcycled Book Box and Multi-media

Hello Peeps!

Welcome to my blog - especially if you are a new follower - and I hope you are having a crafty good time! Before I begin, an inspirational photo to get the juices flowing!


Twilight, just before sunset, at Binalong Bay thanks to Francesco Pecora Lauria who says:
Known for its white sandy beaches, crystal waters and red granite boulders, Binalong Bay is the southern part of this characteristic coast on eastern Tasmania called Bay of Fires.
Shot at twilight before sunset on a cloudless day.
www.instagram.com/francesco_pecora_lauria


How's that?

I have redecorated a Book Box I purchased a few weeks ago for half price - clue, it cost me under $10! I bought it at one of those hippy shops where there is a smell of incense and the sign on the window says "Everything half price today" but the sign has been there for weeks!


It was a Harry Potter book apparently.......looks more Lord of the Rings to me


I purchased it because it had a linen-like look to the cover and it wasn't too thick

I started by painting it white - two coats
Then I glued with Modge Podge some scrap bits and pieces I had, added some texture paste through a stencil and a wooden bit - the bird.....


I did the box redecoration for my DT item at Ecelctic Ellapu, where the challenge for March is "Anything Spring"! With all the snow in Europe and the UK from "The Beast" I can only imagine that crocuses will be popping up all over soon! Not. However, we are going into Autumn and the autumnal days are beginning to cool down at night. We had a super sunrise this morning - red skies in the morning leading to ........still overcast day at the moment but quite warm, about 20 degrees.

After it had dried a bit I started with the sprays and added lots of different types - some with mica and some just paints. I then let it dry but of course I got too impatient and added the flowers and lock with glue and a clear Gesso - so you can see the paintbrush strokes and the sprays moved a bit.


I tried to paint the bird yellow but it just ran into a greeny-yellow
The word under the leaves says 'explore'


I sprayed the flowers and then added some Starlight Paints to make them stand out and be sparkly


The whole thing is meant to be 'Spring' like but it seems a bit dark in the photo's - although irl it is not so dark. I did rub TH black Soot over it as well. Tried to create shadows.


Taken outside in the sunlight


Anyway, it is done. I will use it to keep my collage/multi-media bits in perhaps......

Hop off over to Ecelctic Ellapu, and visit the challenge and the DT inspiration there.