Monday, 25 February 2019

Mindfulness and Unstampabelles

The first challenge at Unstampabelles this month was to be:


#86:Simply Bright and Cheerful 
TWIST Arty Creations Appreciated


 $15 Gift Voucher 
(via PayPal or direct to on-line store, whichever suits)

What is not more Bright and Cheerful than an amazing sunrise!


from Wineglass Bay as the sun rises covering the Freycinet Peninsula in golden light 
thanks to Denham and Annie Thompson 

I decided to make a card using a Mindfulness pattern I had previously coloured in using ordinary pencils. I was given a booklet of  various patterns and the pencils for my birthday last year by a friend. I was not sure if I was being told I need to chill or it was just all the range at the time. 

I chose to think it was the latter but did get pretty chilled colouring them in. 
What does one do with them then?

This perhaps.....


An experiment to foil directly onto the thin paper - it tended to cut as I was using s shim and put it through several times. Note: does not need to go through too often when paper is thin.....


It foiled OK but the hole had to be plugged again and several of the scrolls are 'loose'...


After chopping off the unwanted bits, I added them back inside - a bit arty?


I then doodled some lines into the white space....


In full sun


Outside in shade - the foiling is harder to read on the busy background
I did think of foiling it onto card and fussy cutting around it but thought it would be a bit too clunky.

Might go and colour in some more now....

Why not enter Unstampabelles and show us what you can do that is 
Bright and Cheerful ...and ARTY!


Monday, 18 February 2019

Back after a Quick Trip to Melbourne....

.....to celebrate an 80th Birthday and a 50th Birthday and visit with family. We didn't fly this time but took the boat (ferry) which meant driving to the other end of the island and catching it at Devonport. It was a very hot trip. We dropped the cat off and visited with family on the way and then caught the ferry across over night. It was a bit rough but we were OK in our cabin.


This is in the old port in Melbourne (actually taken on the way back) but our ferry is on the LHS out of the photo - this has been left as tribute to the sailing history of ships to and from Melbourne and replaced with new facilities (away on the right out of the shot).  You can see a  cargo ship leaving in the distance of Port Phillip Bay.


The four neighbours who grew up together at Glen Iris.
The chap on the right is the youngest (under 80)
the Birthday girl is in the middle and it was her 80th birthday!
John (hubby) and his sister are the other two


On the day we returned we went for a long drive before hand and had lunch at a place down the Mornington Peninsular called Mt Martha. It was a very hot day. We wandered down to the beach after lunch and while John stayed in the car I braved the HOT sand and photographed the famous boat sheds!


Weasley was very clingy when we got home - he has taken to sleeping on me in the evening again. 
Claws are usually not too far out!

I have a piece of inspiration to share for 

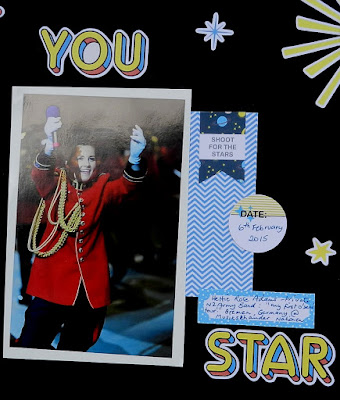
A photograph of Hettie singing in Germany popped up in my feed a few weeks ago and then while I was cleaning out my work space I found this photo  - I quickly decided to scrap it and so I looked for some thing Bright and Cheerful to use.

I found a set of emphemera from D'Lish  - a boy's set of rockets and space stuff; I used some of it


When I showed her the FB post from 4 years ago her response was "My first overseas tour!". Now, how many of us can say that at the ripe old age of 23? 


It was a lovely photograph and it appeared in a newspaper in Bremen as well as being on their website which is how I got it. 

Layout is simple and clean

You can create for Unstampabelles too as there are two weeks to go for the challenge!


Monday, 11 February 2019

Week Two in February for Unstampabelles!

The only thing you can say is WOW!


A fiery sunset from Dodges Ferry thanks to TAB & H Photography TAS - by Leoni Williams who says:
"Sunsets are like a box of chocolates, you never know what you are going to get"
www.instagram.com/images_by_leoni.williams

Such beauty - but the smoky atmosphere at the time added to the drama of the setting sun.
Dodges is about an hour away from here - or maybe less.
It is a favorite swimming beach in summer.

Unstampabelles have a new February Challenge#86:
Simply Bright and Cheerful TWIST Arty Creations Appreciated

There will be a prize for this month
$15 Gift Voucher 
(via PayPal or direct to on-line store, whichever suits)


For this week, I made a gift voucher container - or money or even a small gift
I used SU papers and card
As well I used an SU die to create the small bag.
I diecut two strips of hearts in the front panel before taping it up


I added some card behind each heart strip before taping it up as well....


This is the back


Then I created a tag to go inside and added some decorations to the front


You can see the tag here - I added a diecut sentiment to it as well


The ribbon and the sentiment both come with the die set
Mini Treat Bags Thinlets


Something bright and cheerful!
Why not go over to Unstampabelles and check out what is there already and then have a go yourself!


Monday, 4 February 2019

Welcome to February!

Happy Valentine's Day

While not celebrated traditionally in Australia it is gradually gaining more traction....this is a truly Tasmanian take on the occasion. Fairy Penguins nest in many places around the island coastline.
.
These two come from the North West Coast. 

Fairy kisses from #86little penguins.
A little bit (a lot actually) of cuteness overload from Tassie north-weat coast thanks to Jamie Richey.
www.instagram.com/richeyjtas


Hello Peeps - today I am showcasing a new project made for my Unstampabelles Challenge blog. The theme for the challenge (and the twist) is:

#86:Simply Bright and Cheerful 
TWIST Arty Creations Appreciated

This could be for Valentines or for any other special occasion

There will be a prize for this month
I will offer a $15 Gift Voucher 
(via PayPal or direct to on-line store, whichever suits)

I decided if it was to be Arty, then PAINT was involved, so I got out my Dylusional Paints - yummy - and began!

WARNING: photo heavy!


I keep a scrap book of interesting (to me) images and instructions to keep my mojo in good order!
This image of the flower from hearts on a tag was the starting point I used to make my tag...


I was given a new type of garlic crusher (beats my old smooth stone) for Christmas and it was attached to this big piece of cardboard. I painted it with heavy white Gesso. The crusher, by the way, works well!


While that was drying, I got out the Dylusions and covered a sheet of heavy White card (SU), using a variety of methods. When it dried I sprayed water on it as well. I mooshed up several colours. 


The card with the gesso did not dry as fast as I wanted it to so I had a go with the heat gun and the paint bubbled! I decided I really liked that so kept on doing it all over. Once it really was dry, I sponged blue paint over the top allowing some white to show through.


I used a stencil (these all come from D'Lish) and some Texture Paste to add some additional texture


Meanwhile I had punched out some flowers from the painted card and some leaves from the green bit - it was still a bit wet when I started some leaves and I had to stop and wait to get a good crisp punched outline.


 I had cut some stalk strips too and some grass. I drew the grass first and fussy cut! I was having a great time!!


I painted a yellow circle in the middle of the punched flowers and used a black fine pen to go around that. I used white ink in the same way - a fine paintbrush and a dab!


I arranged the flowers and the grass in a similar way to my inspiration piece. I added some yellow ribbon and some text. This was printed off my computer and glued with double sided jac paper before being cut up and then stuck onto the tag. 


I like the rustic feel! 
I had also painted the back with white gesso and when it dried I then 
added some paper so that I could write a message on it. 

Also the recipient can then take the message off and 
restick a new sheet and then reuse the tag!


 I didn't shape the flowers as I wanted it to look a bit flat.


 I did add some glitter glue to the yellow centres but it is very hard to see
- this is the best I can do...