Monday, 16 August 2021

It's all been about me this last two weeks!

 Hello Peeps - I had a big birthday and so I have been celebrating with friends and not doing what I need to do. Needless to say, all good things have to end.....

I had to create something for Unstampabelles based on the theme

All about Me

with a TWIST of a probably self portrait

So...I created a mini album for some photo's taken at a party on Sunday

I started with some old DT paper from Stampin' Up that had a look of the period when High Tea was common, as my party was a High Tea with 11 of my girl friends who could make it in these days of quarantine and isolation

As the papers were only 12 x 12, I had to add two together to make the album long enough, and to giv me a fold back to close the album

I based it on an album I had made in a class in 2019 using a brown paper bag....but of course I used DP papers and made up my own measurements

WARNING:

Lots of photo's ahead!!!!


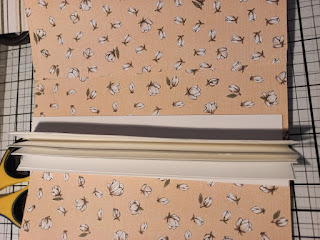
To create a place to add pages to the middle of the album, I cut and folded in half vertically several strips of white card. The you just stick them together until you have enough to make the number of pages you require


You can see here I have sort of got about 4 individual strips - I think I ended up with five.


Then you cut the pages out - I mine in different sizes; some similar to the album size
 and others smaller

I used 2 sided tape to add them to the dividers


Hopefully you get the idea!


I used some plain card too and two small pieces - I had about 8 bigger pages and several smaller ones
I then added some washi tape around the edges of the album cover.


My family is a little different - we didn't have a birthday cake but a birthday platter of cheese and dip!
I decided to put that on the front page and as I was 70 that had to go on too!

I put in the photo's and then it was a matter of just finding stuff to add to embellish the photo's 


The 70 is a cardboard piece wet embossed with gold sparkle
The HB banner has been chewed in one end by Bingo - I added it anyway


Some little pieces to add notes to the album - then open the first page and.......


The table looked beautiful and the people at the table were all good friends and family members


This is me - left side. Red curly hair and green jacket
There were a pile of presents on the table when I arrived - they were told not to bring anything but didn't listen.....they were all on the floor behind me at this stage


The little pocket has in it a copy of the speech made by a friend and the words to the song that they sang to me - to the tune of Raindrops on Roses!


I got some lovely bunches of flowers too that week and took photo's of them to show the senders so I added them to the album


The back of the album


So, an album all about me!

What can you come up with for the challenge at Unstampabelles!


Thursday, 5 August 2021

August Challenge at Bizzy Bec's - finally got one done!

 Hello Peeps, 

I have been so bad at getting anything done for Bizzy Bec's blog but finally have completed a piece for the August Challenge using a beautiful stamp set called 


Stamped with StayzOn Black ink on
but you can use w/c pencils
and some Bling


I decided to paint these with my Uniqolour Water colour Brush Markers on some w/c paper which I had misted with some water after stamping the image.


Here is the colouring underway and the pen's spilling out on my desk
I used my Stamping machine (mine is from Stampin' Up) for the flower but then used blocks for the sentiment and that was a mistake - should have used the machine and got the two lines closer together


I mounted it on blue card and added to a card blank with some bling


You can colour this with any medium such as pencils, inks and paint. I liked the w/c effect I got here.

The Mum's can be stamped on the side of the card. from the top or across the bottom, or masked for a bunch effect. Nice to work with and clean clear stamps.

Bizzy Bec's August challenge runs for the whole month


Monday, 26 July 2021

Art and All That Jazz - Unstampabelles July challenge

 Add in the TWIST of mixed media

Hi Peeps

I just love this college image from 
Romare Bearden: Collage Portraits 
and thought I would try and have a go at it too. 
It might be familiar as it was featured at Unstampabelles for the last two weeks

Mine is unique but very similar

I started by searching Google images for things I might need and then trying to judge the size I might need for them. Apart from the musical instruments which I had to reprint larger I did alright with my eying them off. The original image is in the top right hand corner and I wanted mine to fit on the whole page of the journal

I started by tearing off strips of scrap paper and making a sort of background 
and then Modge Podging them to the page. 


Once I had the background started I cut out four oval (ish) faces from Reflex computer paper to begin my musicians. Next I had to check the hat's fitted them so I added the hats and photographed it when I was happy with the placement so I could remember it for later. I pencilled in the faces (sort of) after I had glued the faces down.


I then thought I could use the Marzipan Twists from Jane and began  sketching in the figures and adding colour to the faces but I ended up wielding a tissue and wiping off the residue as this was not going to work, so I went to the Uniquely Uniqolour Water Colour Markers and yesss....they worked well. 

Oh, I cut the eyes out of the male images and glued them on my faces and then sort of drew the rest of the features from there


In the middle of this I heard rustling and looked up from my standing desk to see peeking through the back at me ...Mr Curiosity! As I had the camera ready, he got snapped before removed!!! Can you see that little black face?


The next step was to colour and paint in the faces of the men, using Jane Davenport paint pens and Uniquely w/c pens plus some Posca white ink and Jane's black paint pens

Then I began some serious cutting out of scrap paper to collage some clothing, glueing them down and  drawing in various accessories such as ties and collars....as artists their clothing reflects their eclectic tastes!

The hat's went back on too, permanently this time, and I began outlining things before adding the musical instruments


I had to add sleeves too and that was interesting....

The hands were the last thing - lifting up the instruments and reglueing them was tricky but I got the hands to mostly look attached and in place.


I did a bit of background work with the w/c paint and added some fine lines and writing: oh, and the drum sticks.....


The bottom one was taken outside to get away from the effect of the light bouncing across the Modge Podge but it is a bit dark. 


This was in direct light and a better look


I worked on it over two afternoons so it dried well inbetween

Meanwhile Bingo found another way to entertain himself on the floor....


Currently he is sitting on the keyboard and making life interesting.

You don't have to go to as much trouble as this to create something for the challenge over at Unstampabelles but in saying that I did enjoy the mess and felt quite chuffed at my ability to recreate a piece of multimedia art.


Monday, 19 July 2021

I played with a white rabbit for Unstampabelles this week!

 Hello Peeps - welcome to mid July. Hope you are dry, cool, healthy, warm, safe and inspired to craft!

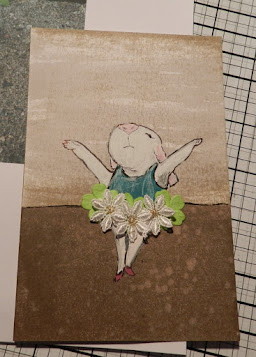
Today I am sharing a piece in my journal inspired by some sidewalk (pathway) art by David Zinn, for the challenge at Unstampabelles

Art and all that Jazz   

with a TWIST of multi media

I saw it on Pinterest and just fell in love with it - this is my version!

I used Stampin' Up inks and Jane Davenport paint pens, some lace and some flowers, plus a Sharpie pen for thin black lines

Here is my dancing rabbit.....

Firstly I used some w/c card and swiped some ink across the card as in photo

The grey ink was painted in later on the top section

I then sprayed the card with water to get dots


He is the inspiration piece - isn't she fabulous!
The moment when a wall meets the footpath and some greenery growing there provides her tutu!
I sketched in the rabbit with a pencil - straight copying


This was the result after a first application of white paint pen.....


Then I used some colour - I chose to go away from the colour in the original to make her more mine


I found some daisy lace ....hmmm...might work.....


Added some green flowers (leaves) behind and it worked.......


Then I put her in the journal and added a border and a statement


I really enjoyed doing this - fun!

Let's see what you can do for the challenge at Unstampabelles!


Monday, 5 July 2021

Challenge #113 at Unstampabelles is Art and all that Jazz

The new challenge at Unstampabelles this month is

July - Art and all that Jazz


TWIST: multi-media piece

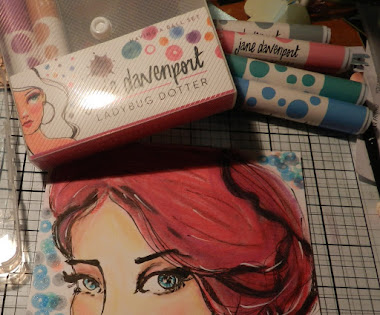
Recently I got some new colouring crayons called Marzipan Twists, created by Jane Davenport
I do love Jane's stuff and I am gradually building up a collection of mediums
These are a really creamy, soft, vibrant coloured crayon that can be smooched or have water added to them to move them around
Today I chose to play with a Jane girl (already drawn on card) and colour her in to see how the crayons responded to me and if I liked using them......the answer is a great big YES!

I got both sets but these are more the face/skin tones
(The corn advert is to cut the glare spot - it is raining and gloomy and so photo's were taken inside)

You can see the image is about an A6 size


I used the crayons for colour and my finger of these little sponge tips (from Jane) to smooth the colour onto the card
I added some white and black inks as well 


She reminded me of the matches girl (Redheads) so I made her with red hair....


Then I used the Ladybird Dotters to create an easy background 


They are so easy to use and if you tap them hard they also splat for you....


Then I added the page into one of my art journals and sort of created a mess around the edges.....
There is torn washi tape and other washi tape plus some doodling 


I am happy with her as is and I learnt a lot about the way these crayons work without using water on them....next time I will try water on them and see what eventuates. 


Happy crafting


Saturday, 3 July 2021

Playing with some new Stampin' Up stuff

 Hello Peeps
I have been playing over the last couple of weeks with some new SU items

You have seen the first card - last week maybe?
Just using DP and a rub on and creating a flower with an old die


I used a stamping set that I won recently for the next few
Set up the stamps on a big block and used them three times in 3 different ways


Stamped with a dryish Stayz On black stamp pad and then sponged with some of the new in-colours for 2021-22: the set is called Enjoy the Moment


Stamped with Archival ink and allowed to dry and then used a Versamark pen over the images and clear embossed them before tearing a sheet of paper and using it as a mask to paint the inks  - a bit like a small stream


This technique is called Black Ice
I was supposed to use Stayz On but initially thought I didn't have any and used Archival
Allowed to dry for 24 hours before I discovered I had SO ink after all - but my pad was not wet enough
I dragged it across and used the Versamark and clear embossing powder and it looks kinda grungy
We did it again in a class  with the proper ink and the other's all turned out well - it has a glassy look to the foil


Made a shaker using the Circle Celebration stamp set and some masking
This has all the colours of the new in-colours but the photo was taken at night so it is a bit yellow....

Looks OK though irl


This one was for a family member
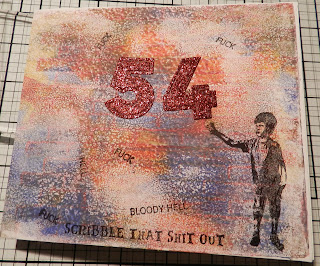
I used Viva Los Vegas stamps....
and a gelly plate background

WARNING bad language.....


Not wonderful and mostly cached but that is way I run these days with limited time....

Cheers, 


Sunday, 27 June 2021

Unstampbelles Challenge #112: Seasons and Seasonal TWIST: use handmade flower(s)

 Hi Peeps....

I quickly made this card this afternoon to celebrate mid-winter.....

It is for the Unstampabelle's Challenge #112

Seasons and Seasonal TWIST: use handmade flower(s)

My handmade flower is made from gold card and green card mixed together


The background is the beautiful new papers from Stampin' Up


I used a rub-on for the sentiment


A quick and easy card for the challenge.

Remember, no stamps can  be used in this challenge!
You have a week left to enter!