Showing posts with label second week. Show all posts

Monday, 13 September 2021

Unstampbelles newest Challenge : Salutations and Greetings with a TWIST of stencilled background

 Hi Peeps - welcome to week 2 over at Unstampabelles where the current September Challenge is 


Salutations and Greetings TWIST stencils in background


I made a couple of cards with one idea I had

I used some Paper Rose stencils I have and the ink is Stampin' Ups latest in-colours
I used sponges to apply the ink through the stencils onto some white card
(SU Whisper White)


I love how you can get depth into areas by applying more ink and it gives s 3 dimentional look


When I was happy with the result, I cut the pieces to size and made a card with each one.....


I love the backgrounds this created


A Kaiser topper and I cut the candles out of scrap card, adding the flames with some smooch paint (red)
Plus bling!


My COVID card went to family in Canberra and was a great hit.
The sentiments come from Uniquely Creative
I fussy cut those Covid germs and my hands knew it for at least 24 hours.......

The wonkiness of the background goes well with the theme

Lets see how you approach the theme and TWIST for the Unstampabelles Challenge!


Monday, 8 March 2021

Journalling page from last year for Unstampabelles

 Hi peeps, I have cheated a bit and used a spread I made from last year in my journal for the challenge now. I will try and do a new page for the journal before this challenge finishes....

Over at Unstampabelles, the challenge is to 

 Challenge#109  Lockdown 

TWIST: Scrap It! 

I have not scrapped it in one sense but in another I have as I have used scraps of paper in my collage to create the bird and the leaves. It started by me painting and smearing onto a sheet of paper and then adding dots and stuff. When it was dry I cut it into scraps and leaf shapes and used these to add to the journal pages. 


I journalled around the edges
More dots of colour and shading were added over the top of these


Some shapes are scraps and some are leaf shaped


More foliage hiding the figure watching in the shadows....


she looks pretty unhappy - it is not a self portrait but she could be some of me.....


Sort of Picasso....


Bingo watching while I was photographing to make sure I don't run away.....

You can have a go at expressing the feelings you have (had) during lockdown too.....


Monday, 14 October 2019

Thank You in Blue - Week 2 at Unstampabelles

Hi Peeps - hope all is going well with you and yours!

Spring is here in Tassie
This is from my garden today


I love rhodies - don't you?

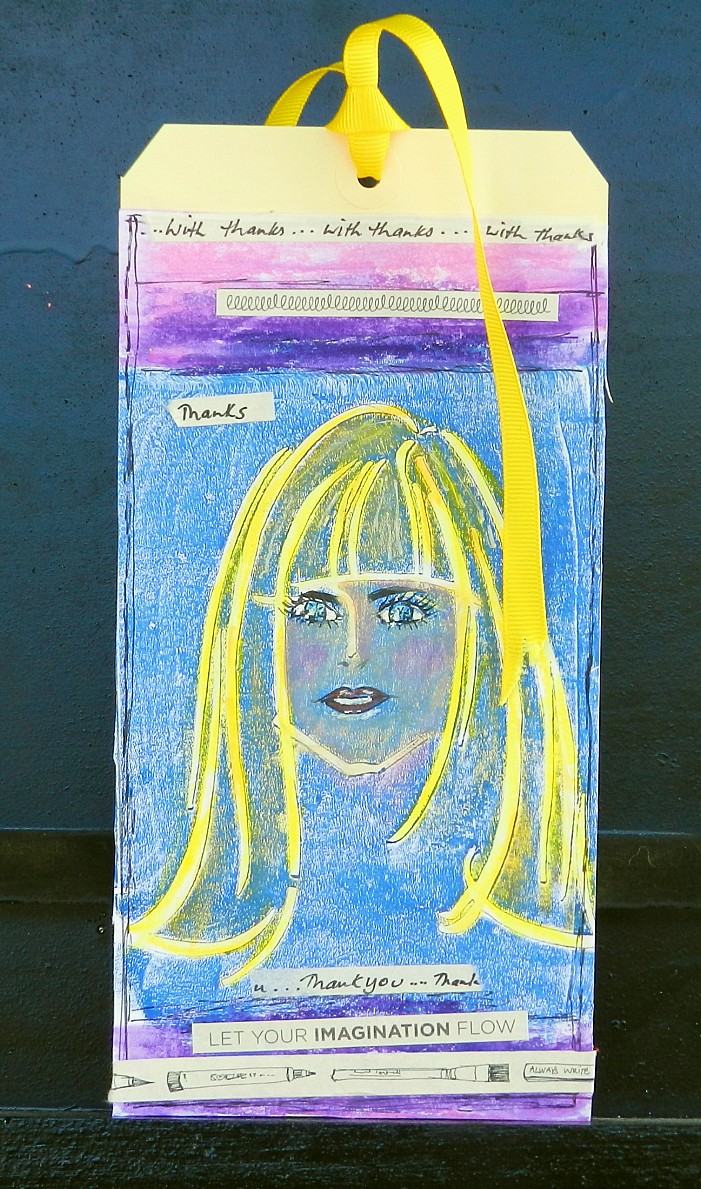
Today I have a tag to share for the DT at Unstampabelles
I took this print from my Gelli Plate last week using blue acrylic paint and a stencil called 
Teen Face by Scrap FX

This was my second print  and it was onto white printer paper. 
My first I did in my journal - it didn't come out as clear but is pretty good. 

Before I remembered to take photo's I had begun to draw in the eyes and mouth
 and colour in the face using a variety of pens at hand


Once I decided on a tag, I added some wide double sided tape to the back of the paper and then 
attached it to the tag, cutting off the excess


I remembered I had Gelato Crayons so found them an began to use a bit of colour on hair and face and top and bottom of paper. 


 A close up of the face...


I added some washi tape by Jane Davenport and hand wrote on the plain one


Some ribbon in the tag and it was done!

What are you going to do for this challenge?


Monday, 9 September 2019

Beautiful People

 Hello Peeps!

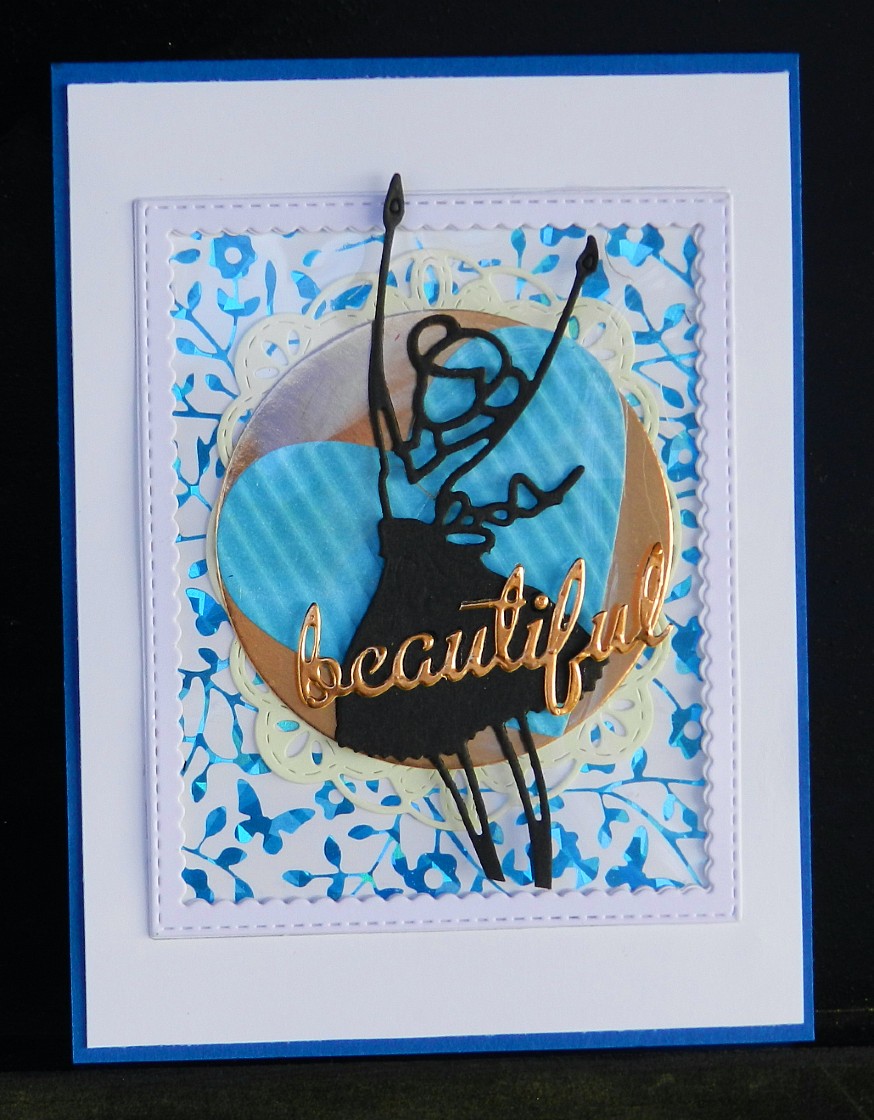
Today I made a card for the second week of the Unstampabelles Challenge#93

Time for Recess (Apertures)  

TWIST Luscious Layering

I went through all the scraps on my desk that have been building up all year and found bits!
Then I began layering.....


Once I had found my layers I started the aperture by die cutting a rectangle 
from a piece of white card (SU Whisper White) 

I have several similar frames already die cut and this added a third, 
so I layered them together too with some glue to enlarge the recess.


I put some acetate behind the aperture
and glued the built up frame into this recess. 


Behind it I had layered:
#a piece of foiled background
#a cream die cut frame
#a circle of bronze card
#a blue corrugated heart


On the top of the acetate I added 
#the die cut girl
#part of a sentiment cut from a bronze card scrap


Then I layered all this lusciousness onto a blue card


I love the sparkle of the background


Taken in the weak sunshine of today it is a bit less flamboyant but still beautiful!

So, I got to use up some of the bits I couldn't throw away
and I got to create a card with a recessed bit to it!

You have three weeks to enter

Yes, there is a prize:

$15AU Gift Voucher

I am entering this in the following challenges:
Happy Little Stampers: Anything Goes with Dies
Love to Craft: Anything Goes


Sunday, 7 July 2019

Fairy Wishes from Unstampabelles

Hello Peeps -

It is week 2 for July's Challenge over at 

Challenge #91: Stunning Stencil Play

and the TWIST is to try and use spays in your work 


I am so pleased I got to use up old stash in this piece.

Firstly, I sprayed some Dylusion Sprays onto my silicon mat and 
then swooshed a piece of watercolour paper through it until I was happy with the outcome.


I found a pretty stencil and layed it over the card when it was dry and used my TH Distress Resist Spray over it . (Obviously I did not take any photo's here)
Now, you can probably see some gold embossing not going on there.
That is because I read up on the Distress Resist Spray first - a miracle - and it said that you must get the spray off your stencils quickly (with water). I had an idea I was going to emboss the negative, as the spray is like a sticky glue, but between spraying in a box, carting the stencil to the water and then trying to emboss, the spray dried up! 


This was what I was left with after rubbing Black Soot ink over it. 
Can you see that the Distress Resist gives a shimmery look and some texture.
I will try this technique again but hopefully it will work better next time. 


This was also the stage when I realized that my stencil probably wasn't a good one for this technique anyway. I thought it looked a bit deep sea-ish, and went looking for water inspired dies to cut and create a water scene but I found an old sticker sheet with one fairy left on it - it was perfect. 


The photo above shows the sticker clearly in the clear light
but the one below is what it looks like in real life and in direct sunshine


The sentiment is a sticker for the sheet too - I layered it onto some white card and fussy cut it out and then popped it up on some dimesions. I think the gold bits that did stick look like some kind of magic energy going on here. 


Talking of magic, winter can certainly produce it's own version:


'Wombat Love', from the Cradle Coast in north-west Tassie, thanks to Leanne Hays
www.instagram.com/wombat_at_80


Monday, 11 March 2019

One for the Rooster's Today!

What is that saying? "One day a Rooster, the next a feather duster!"

Let's hope these chooks get a better run - they certainly seem to be ahead of the game already! 
Not sure how much better their run could be with that view!


Margot Kelly, on location, at Sheffield.

Margot says: “Former dairy farmers, Phil and Angela Glover, now run 3400 hyline brown hens on pasture for eggs. It takes three hours a day to harvest the eggs by hand.
Last year the standard for 'free range eggs' was changed to be 10,000 birds per hectare.
This niche operation stocks 1,000 hens per hectare.
I was amazed to see the girls spread out across the entire paddock they were given.
🥚🥚🥚🥚🍳🍳🍳🥚🥚🥚 I was more amazed by how friendly they were! I had them running between my legs and stepping on my boots! 

The Rooster's today are the Men and boys from our lives

It always seems harder to craft for them but really it is not - if you just  plan your colours


I did this by picking a sheet of patterned paper first and building around it. 
After finding a great quote, I then decided to make a wallet for a present of money.

Most kids like money these days as a present and it makes life easier but it always seems to be to be a bit impersonal so this was a way to make it more personal!


My green peg made a great closure


The sentiment (quote) on the front was obviously hand written


I could hold quite a few notes - this is Australian currency for those unfamiliar....
we are up to the 4th series of polymer notes and they are very colourful


I added another sentiment inside to go with the quote!


This is the back of the wallet.....


This is the wallet standing up - can you  see where it fell over and got crinkled?

I made this for Unstampabelle's 
where the challenge is to make something for Boys or Men 
TWIST is to add a staple or a peg (or both)

You have three weeks to enter

I will be entering this in the following:

Dare2BArtzy : Anything Goes
The Corrosive Challenge: Anything Goes


Monday, 8 October 2018

Second Week at Unstampabelles

Unstampabelles has a new challenge for October

It involved using GOLD foiling and/or glitter
TWIST - to make it white and gold only


Of course I used my foiling machine to make the sentiment


You cannot use stamps for Unstampabelles but foiling plates are OK!

Then I used glitter tape, and card as well a some gold card and thread
I die cut three feathers


I added some clear beads to the ends of the gold thread and tied a bow


The gold strips were layered depending on size under the thread and feathers


White and varying shades of gold


That's all folks - we are away so hopefully this schedules well!


Monday, 10 September 2018

Button Art in a Bag......

Hello people...

I have a new DT project for you for Unstampabelles

Apparently Buttons frightened crafters off as there are no entries yet for the month....

Anyway, I decorated a white paper bag - one I was given with something I purchased a few months ago, so the bag itself is being reused.


As it is Spring  I went with a flower scene

Firstly I used my luscious Dylusions paints and created a background on a sheet of Whisper White (SU).


I used TH Distress ink's to stencil on some foliage using a sponge


Then I raided my button stash - in the middle of this I knocked a lot of button's off my desk and spent the next 24 hours removing them from the claws and jaws of Weasley!!!! The upside of this was that I had to clean up a bit!!!

Once I decided on my buttons, I glued them down and let them dry for a day before attaching the panel to the bag.


I did think of adding twine to each button but quickly gave that idea away as my hands are not that capable at the moment of sewing. I did add some washi tape to the edges and co-ordinated the back with two strips also


I used two rub-ons for sentiments


OK, that's it.

You can make a card, a tag, a bag, a box  - recycle if possible too - and/or create a mixed media piece.....up to you and your style.

The photo I am sharing to say is black and white and shows off the idea that Spring is not all sunshine and blue skies. It was taken on the top of the mountain in the city and that is my bay there on the far left just off the edge from the bridge. Lindisfarne is the first bay with the boats in there and Geilston Bay is the next one up from there (out of the picture).

The hill in the far distance is Maria Island and Mt Maria
That is just near where I grew up and an hour's drive from the city.
The water in the middle is known as Pitt Water and leads off to the right into Frederick Henry Bay
The bridge is of course the Tasman Bridge
I love the cloud line in the forefront......hiding the top of the mountain.