Monday, 21 October 2019

Midway through the October Challenge for Unstampabelles

Hello Peeps!


The challenge at Unstampabelles this month is to make something
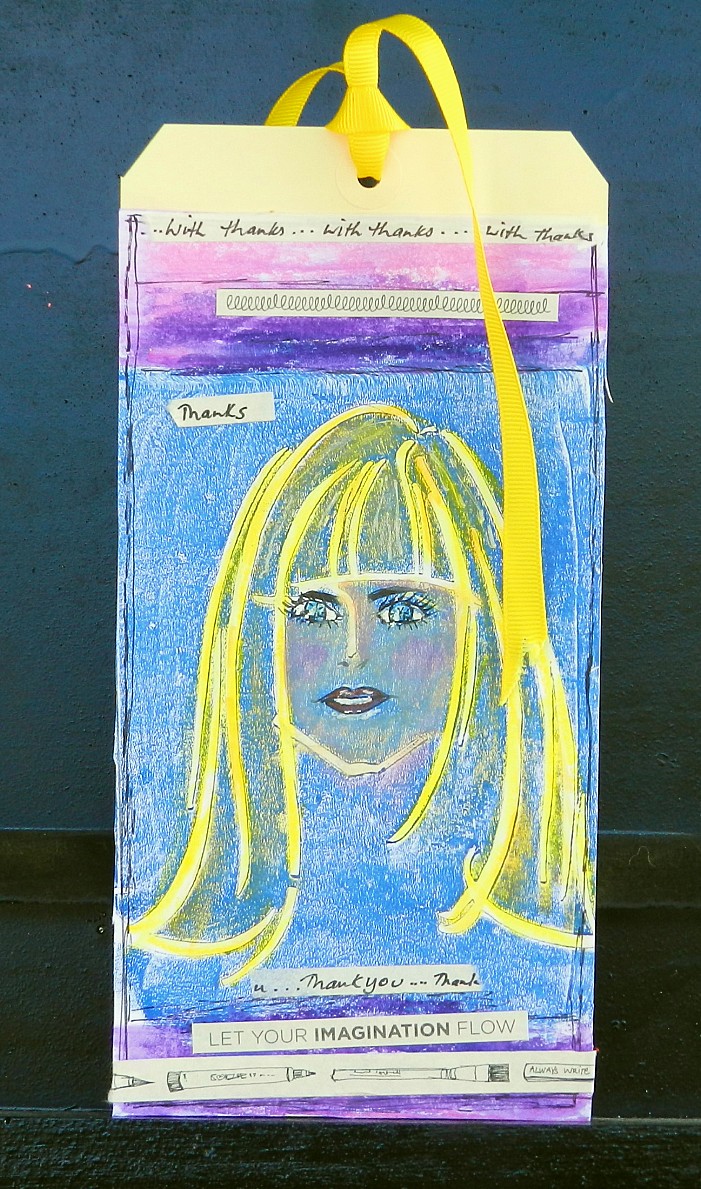
to say Thanks or Thank you or Thankful

The TWIST is to use blue in your project

There is NO specification of how much blue though.....

Under the pump as always, I wanted to make something quick and simple

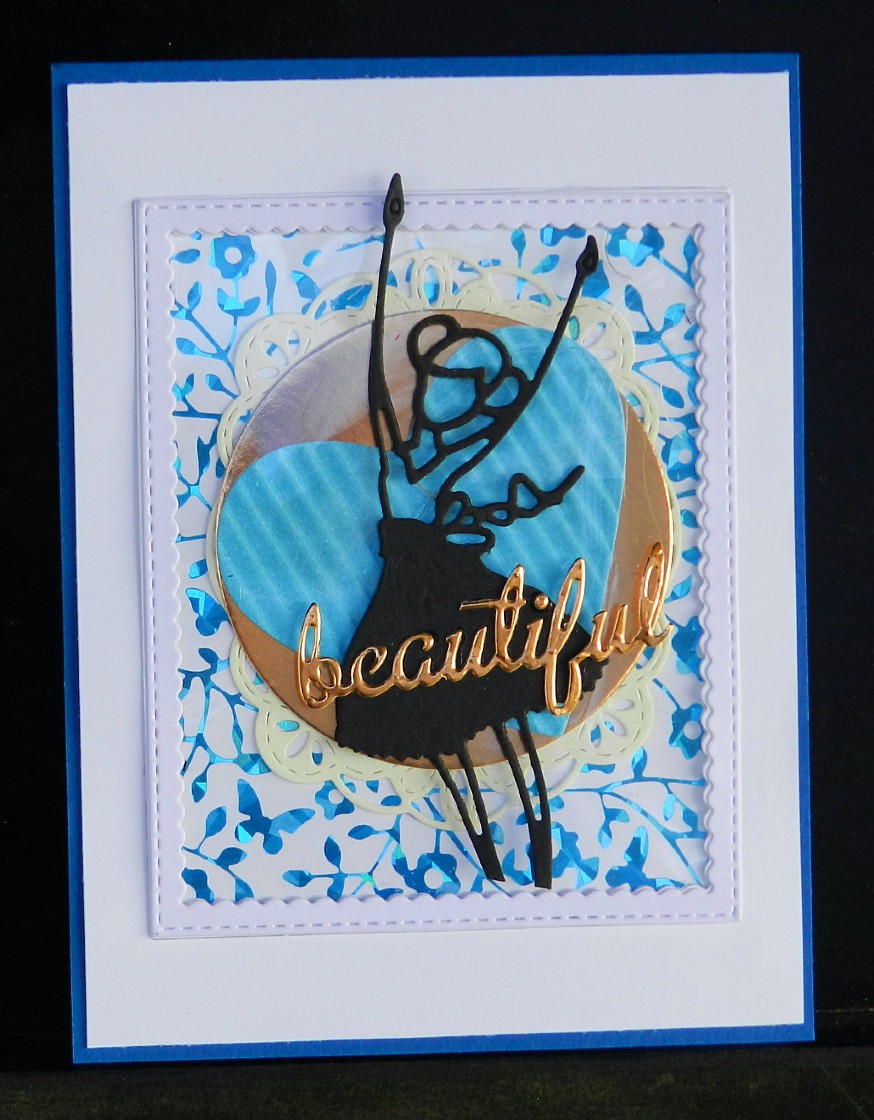
I started by getting my finger dirty........


I grabbed a scrap of white (SU WW) card and then started rubbing the wax onto it
I LOVE these waxes - they're so creamy and full of colour and a beautiful shimmer


The top one is  Old Denim and this one is called Blue Lagoon
They were both buffed with a tissue

I added a bit of the darker one onto the lighter one in one corner too to have a meld occuring


I then punched out three circles using an OLD SU punch that is still going strong!


I die cut the word from the lighter sheet as well
The foliage die is called Fresh Foliage by Memory Box
 and I used gold mirror card for that


I played with my photoshop program and got a few different hues and tints going
for the shots as well as being in several places outside in the overcast light


I could have done this with sparkling card or plain coloured card
but the wax gave me such a sumptuous, rich look.
You can see the shimmer happening in the first photo of the post.

I wanted the recipient to really feel thanked!

So, simple and elegant card
What is your contribution going to entail in this month's

Remember - there is a prize for random number draw. 


Friday, 18 October 2019

Kisses and Cuddles for Bizzy Bec.....

Hello Peeps

Sneeking in with a post for Bizzy Bec

Using a stamp from Penny Black called 
Loveable

I needed a card for a Baby Shower.

I had an order in with Bec and it arrived today - funny story....
I knew that I had ordered this stamp but when I went looking in my stash, I could not find it.....
perhaps because I had not yet received it!

I had also got a "Just Add Card" embellishment kit 
so used it with the stamp to make the card. 
Saves putting it away, hey!


Stamped and coloured it in with w/c pencils and a brush


Added some papers, and embellies from the pack as they came to hand.......


Love the words with the set - it also has a cute hedgehog!


How was it made?

A Cardmaking kit full of embellies

I used a few on here, including ribbon, die cuts and bling!

(If it is not there, ask Bec about ordering it)
There is a die set that goes with it - 51-491

and a Snap Dragon set of Rectangle dies. 

Bec does not carry either of these brands BUT 
there are many other rectangle dies that she does stock - check them out!

Cheers, 


Monday, 14 October 2019

Thank You in Blue - Week 2 at Unstampabelles

Hi Peeps - hope all is going well with you and yours!

Spring is here in Tassie
This is from my garden today


I love rhodies - don't you?

Today I have a tag to share for the DT at Unstampabelles
I took this print from my Gelli Plate last week using blue acrylic paint and a stencil called 
Teen Face by Scrap FX

This was my second print  and it was onto white printer paper. 
My first I did in my journal - it didn't come out as clear but is pretty good. 

Before I remembered to take photo's I had begun to draw in the eyes and mouth
 and colour in the face using a variety of pens at hand


Once I decided on a tag, I added some wide double sided tape to the back of the paper and then 
attached it to the tag, cutting off the excess


I remembered I had Gelato Crayons so found them an began to use a bit of colour on hair and face and top and bottom of paper. 


 A close up of the face...


I added some washi tape by Jane Davenport and hand wrote on the plain one


Some ribbon in the tag and it was done!

What are you going to do for this challenge?


Monday, 7 October 2019

Thankful in Blue.....for Unstampbelles

Hi Peeps: well, it is Challenge #94 over at Unstampabelles for the month of October and the challenge is

Well, Thank You 


TWIST Brilliant in Blue


I have on offer today a journal page - it is the second one I have completed in my new 
Jane Davenport Journal

I used Dylusion Paints, TH inks, a black and a white Posca pen and my new gelli plate
along with a Scrap FX face stencil and various other stencils in my stash for texture


I am new to mono printing and had so much fun pulling off these prints
Next time I might be brave enough to do them directly into my journal rather than onto printer paper!
I have some other ones - the ghost print and the first print - so expect to see them soon!

I did add some colour to her face with the Scribble Sticks


Can you see the stencil in the top photo in the left top side?

I had used the left over paint to smear onto the page prior to pasting the gelli image - I had wiped it up with a baby wipe so just used that to transfer some blue colour to the page by smearing it on.


Then I played around with yet more stencils and TH inks
I got a quote from the internet and printed it out on computer paper, 
cut it up and used it on the page too.

I outlined each piece with black pen


While I was working the weather outside was beautiful - a true blue spring day
and this quote just seemed so right

I added the rays of the sun to reflect the day.


The last two photo's were taken outside in the bright light of the late afternoon.
You can see a gelli plate final image on the lh page - the paint had pretty much all transferred by then but I had one more go with getting it onto the page. 
I will add others onto it - probably stamp into it as well
(Horrors! Stamps!)

I am please with my page - number 2 in my journal
and it didn't use any stamps on this one!

I have watched so many video's lately on journalling and gelli plate printing
AND I ordered more acrylic paints!
Shh - don't tell on me....nowhere to store them atm!!!

You can go over to Unstampabelles and see the linky party ready to be used
 and the other work from the DT girls!

See you there!


Friday, 4 October 2019

A Christmas Edge

Hello Peeps:

 A card for October's challenge at Bizzy Becs. 

I used a new Creative Expressions Paper Cuts Die called 
Holly Berry Edger ( CEDPC1049)

It makes making all those Christmas card easy-peasy. 


The sentiment is a Creative Expressions Festive Mini Expressions - Christmas Wishes 
(CEDME036)


Some Christmas DP and gold mirror card behind it
The DP was also die cut using a square die


Plus of course the obligatory sparkle bling!

The dies cuts were using red sparkly card for that extra festive feel

If Bec does not have these in store, 
ask for them by number  and name and she will get them for you.

It's Anything Goes at the challenge at Bizzy Becs this month!

Monday, 23 September 2019

Tag for Aperture Fun!

Hello Peeps

Over at Unstampabelles the final week for Challenge #93: Create an Aperture or Recess is underway and the TWIST this month is to layer your work.

I made a tag to include with a present that will mean I don't have to make a card as well.

 I used a die to create the circle aperture


Behind it I used a print I had pulled while playing with my new Gelli Plate
This is acrylic paint and stencil experimentation

The sentiment is also die cut 
The butterflies are purchased.


I cut a large tag and just assembled it as you see.

Photo's taken in sun and shade. 


If you are wondering why not Tassie photo's -
life is a bit frenetic. 
I have a brother in hospital atm with an infection from an operation
 to remove a brain tumour and so any extra time
e is taken up dealing with the overflow. 

He is doing OK considering but its a bit stressful. 

Anyway- you have five days to enter the challenge at Unstampabelles
Yes, there is a prize for the random number draw. 

$15AU Gift Voucher

Wednesday, 18 September 2019

Strong Women for Bizzy Bec!


Hello - my turn to add to the blog over at Bizzy Becs Store.

Summer is not too far away and the idea of a dip in the waves is refreshing.

Why not make like a Mermaid and dive in to 
the current challenge on the blog. 

Taylored Expressions has a new stamp and die set
called Be a Mermaid (set of 10)
with matching Dies - Be a Mermaid

So I made another Mermaid card using these.

This card was made using a background stamp 


The rectangle die is from Scrap Dragon


Taking photo's with Weasley around can be interesting......


Trying to get the sparkle to show


In the late afternoon sun


Tails were on dimensionals to lift them up a bit.....


Can you see I used shimmer card here? 


The tails were coloured in using w/c pencils overlaid with  Stickles Stardust.
I added some sequins

Be Strong
Make some Waves!

There is 15% off these atm at Bizzy Becs Store. 

Why not enter the current Anything goes challenge as well!

I will enter this in the following challenges:
Papercraft Challenges: No Designer Paper - must stamp
Through the Craftroom Door: Anything Goes (must be a member?)

Monday, 16 September 2019

Love - a Symbol of Eternity

Hello Peeps:

Another busy week sweeps by and it is time to show you the card I made for the third week of the 

Create a paper project with an Aperture (or Recess)

 in the project. It can be 3D or it can be layered......
in fact the TWIST is 

 Luscious Layering


The prize for the random number draw is as always

$15 (Aust) Gift Voucher


My card for the DT Inspiration this week has an aperture showing behind it 
a saying about love


It could be a wedding card or a celebration of an Anniversary


I am CASing the idea of Lou Kitzelman
(thanks Lou)


My materials include SU card and DP and stuff from my stash.
The bouquet is die cut from Memory Box dies


The tag is handwritten and the sentiment is 
an ld rub-on that was almost over it's useby date!

I love the way the recessed 'box' is layered behind the DP
just using a square die to cut out the space and 
a smaller one inside the opening to cut out the gold border.

You have two weeks to enter the new challenge for September


Monday, 9 September 2019

Beautiful People

 Hello Peeps!

Today I made a card for the second week of the Unstampabelles Challenge#93

Time for Recess (Apertures)  

TWIST Luscious Layering

I went through all the scraps on my desk that have been building up all year and found bits!
Then I began layering.....


Once I had found my layers I started the aperture by die cutting a rectangle 
from a piece of white card (SU Whisper White) 

I have several similar frames already die cut and this added a third, 
so I layered them together too with some glue to enlarge the recess.


I put some acetate behind the aperture
and glued the built up frame into this recess. 


Behind it I had layered:
#a piece of foiled background
#a cream die cut frame
#a circle of bronze card
#a blue corrugated heart


On the top of the acetate I added 
#the die cut girl
#part of a sentiment cut from a bronze card scrap


Then I layered all this lusciousness onto a blue card


I love the sparkle of the background


Taken in the weak sunshine of today it is a bit less flamboyant but still beautiful!

So, I got to use up some of the bits I couldn't throw away
and I got to create a card with a recessed bit to it!

You have three weeks to enter

Yes, there is a prize:

$15AU Gift Voucher

I am entering this in the following challenges:
Happy Little Stampers: Anything Goes with Dies
Love to Craft: Anything Goes